Before you start your “My Surveys” journey within Kartra, we would like you to note the following:
We will refer to everything herein as “surveys”, even though this feature contains functionality for both a surveys or quizzes.
Surveys can be hosted on a standalone page generated by our system, a JavaScript embed to place on external (non-Kartra) content, or you can use it as a component feature within the various features within our system (such as Kartra page).
As with most web based content, cookies are an important factor and highly recommended for your customers to get the perfect experience. Though not technically necessary, it will help ensure you get the most accurate analytics and data.
Now with this knowledge, lets begin your survey experience.
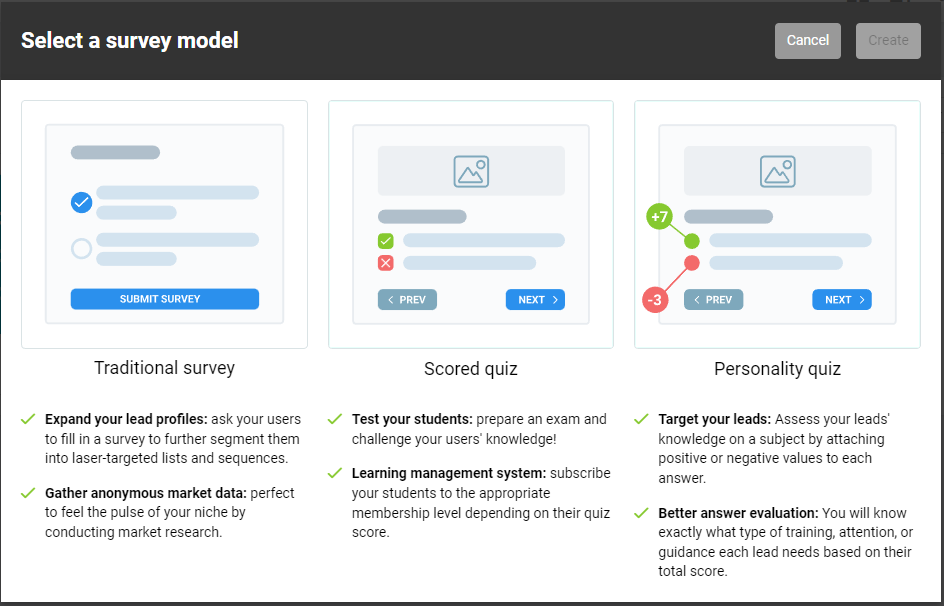
The first step of the setup for a new survey is to choose which type of survey you wish to use, “Traditional survey”, “Scored quiz”, or “Personality quiz”.
For some clarification the survey feature is just a simple questionnaire with no right or wrong answers while a quiz has the option to collect a grade from your users (A ratio of correct answers compared to your total questions).
*Please note: It is possible to create questions that do not have a correct or wrong answer in the quiz (such as a rating); in these situations our system will default to marking the question as wrong yielding zero grade/points. So please design your quizzes with this knowledge in mind.
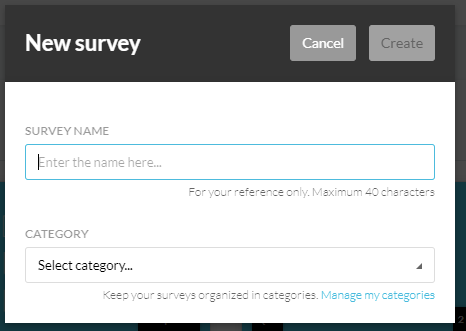
Now after you choose which feature you want to build you will then need to choose the name for your creation. You can also include a category to help organize your content or you can set as “no category in particular” if you wish to have no category option.
*Note: That all Kartra windows (such as this image above) will have the create/finish/etc. button disabled until all your choices are made. If your button is still grey then you may have missed something in your setup on the currently viewed page of content.
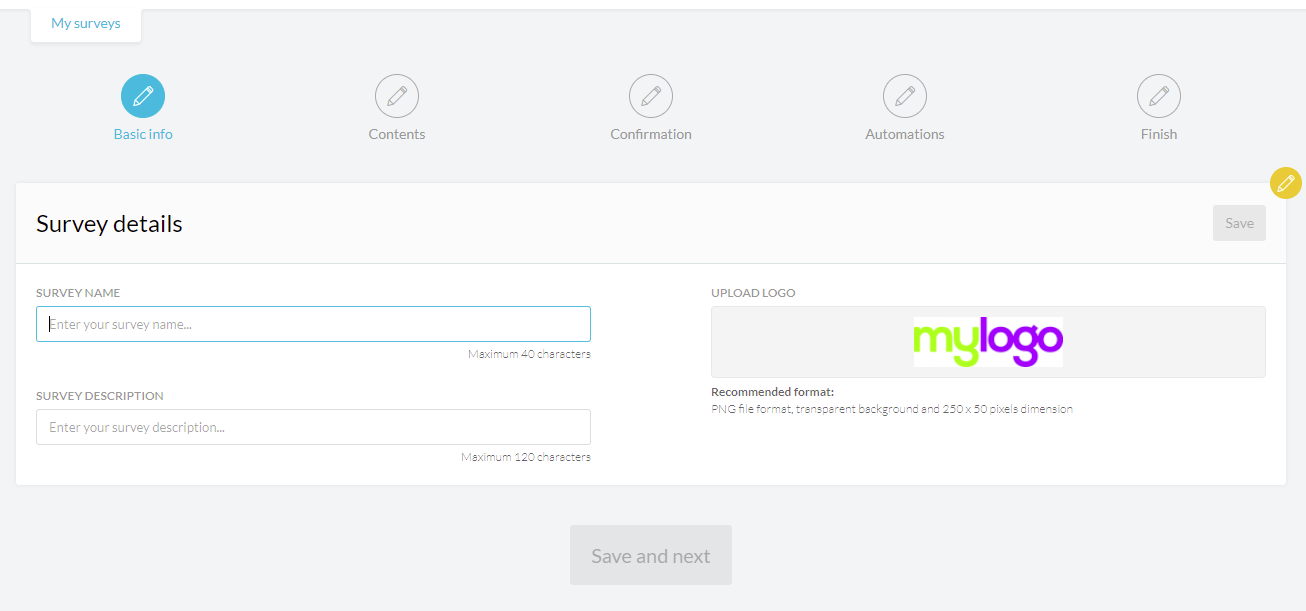
After completion of your choice of survey and setting the basics of your name/category, you will then be brought into your setup wizard for your survey. The first tab (“Basic Info”), will give you the option to rename your survey, set a description for your survey, and provide a customized logo. For your logo we recommend a PNG image file that has 250 x 50 pixels dimension to ensure highest quality when your logo is viewed.
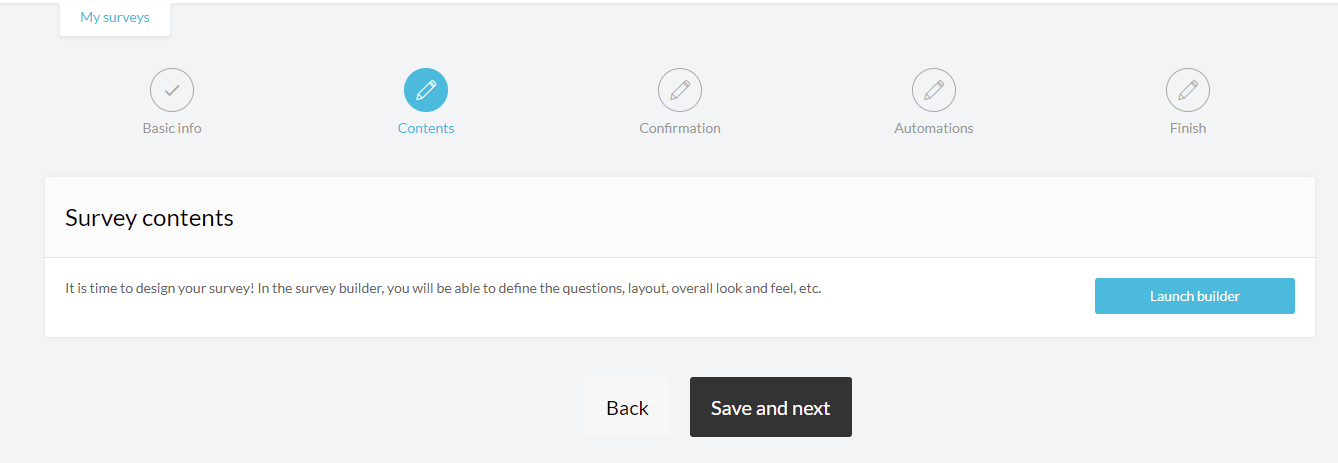
Once you complete your basic info you can then start work on your survey and enter your primary survey builder by clicking the “launch builder” button after “save and next” within the “Basic info” tab.
*For now, lets set aside what is contained within the builder and move on to complete the setup wizard. More details on our builder will be covered in a separate section below.
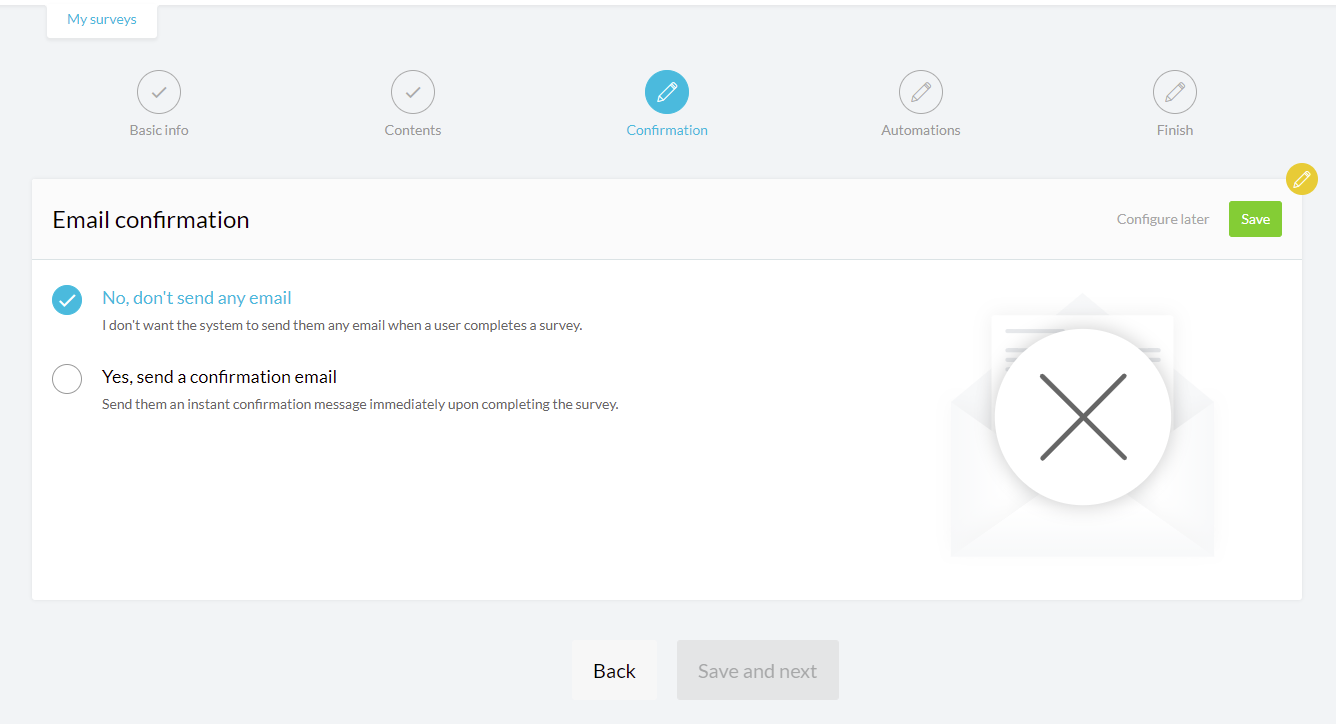
Once you have constructed your survey the next question is, do you want to send a confirmation?
This feature will send out a email to your users upon completion of the survey. And if you do not want to send an email to your lead, then just set this as the default “no” option. By default, the email used to send the email will be your KartraMail global setup under “my integrations”. You can customize this email for every single survey within your survey’s configuration options if you do not wish to use this global email.
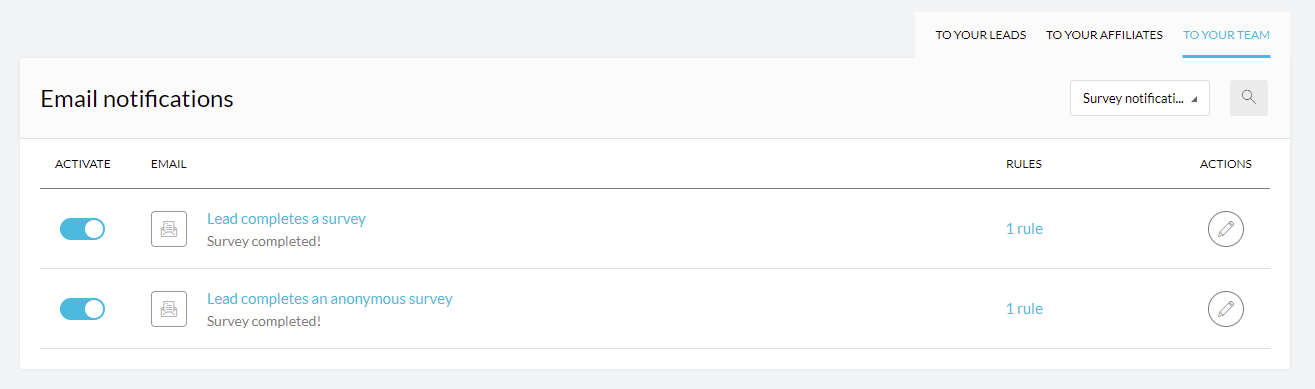
*Note: Be mindful there are may not be survey notifications for “to your leads” or “to your affiliates” in email notifications, as the one notification “to your lead” is setup within the survey itself.
Regardless of your choice, upon completion of your notifications you can then press the “save and next” button to bring up the typical automation tab found in most of our content. From here you can set the standard Kartra content you would expect; including tags, lists, sequences, and automation.
*Note: Your survey will not show up in your automation or sequence options until you complete your entire setup for the first time. So lets say you want to create an automation to trigger on a specific type of behavior based on the answer from your customer in this quiz, that option will not show in your automation at first. Completing your first setup all the way, exiting out, and then coming back in, should then have the survey saved in your database and it will now show as a possible option when adding an automation.
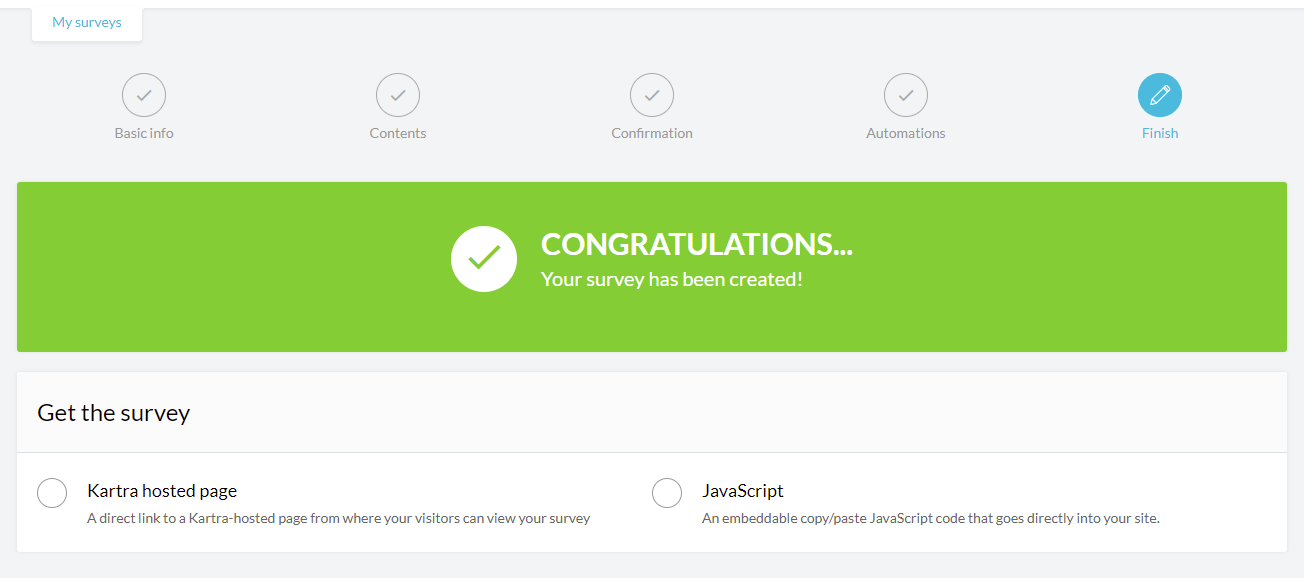
And finally, with your last confirmation with “save and next” you will be presented with your final information on your survey setup.
This will include a Kartra hosted checkout page that will contain a stand-alone version of your survey, but also a JavaScript code that will allow you to add your content to any external website content you may operate.
*Note: If you intend to utilize the survey as a component on some other Kartra content, then you do not need to use either of these options. As the components will be a simple drag and drop option within whatever content you make within our system.
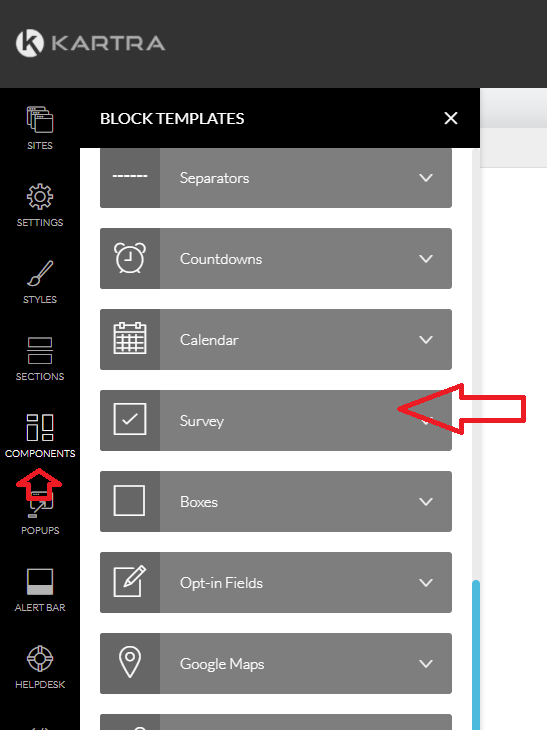
As you can see in this example within the Kartra page builder:
And with that we would like to congratulate you on completion of your Kartra Survey. If you have any further questions or concerns not mentioned in this documentation then please feel free to reach out to our support channels here: https://home.kartra.com/contact
As we dive into the survey builder, we will be covering each feature separately rather then in the form of a walk through. How you want to approach your content is purely up to you and you can include (or not include) any of the various features.
General format of the surveys in the builder:
Intro Cover (Optional)
Questions (Required)
Identification (Optional)
Success (Required)
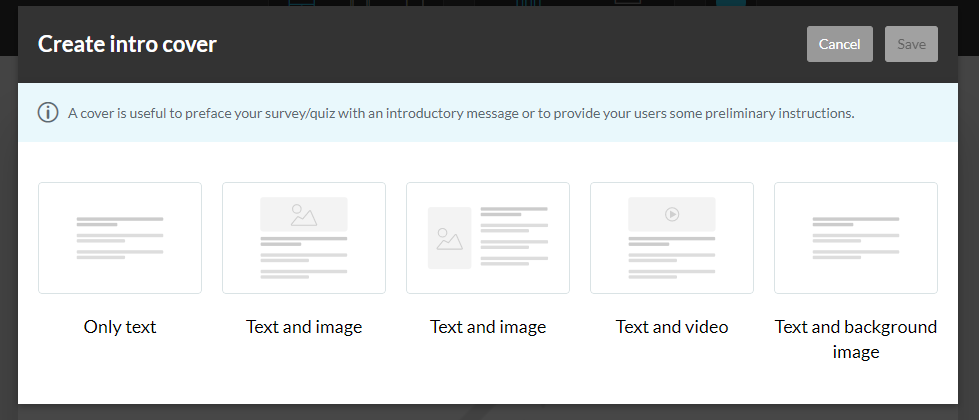
Intro Cover: (Optional)
The intro cover is what your customers will be greeted with upon their first view of the survey itself.
*Note: If you do not have a intro cover enabled, then the first question will be displayed instead.
You will have a variety of different template forms that allow you to customize your cover as you see fit. But please be mindful that you cannot add components to these covers as you would in a Kartra page builder.
If you are looking to customize the look and feel of the page your survey is on, then we highly recommend you utilize the Kartra page builder and customize the content around your survey there (while using the survey as a component on the Kartra page).
*Note: If you delete a component in one of these covers, you will not be able to add it back in. Unless you delete the entire cover and then remake it from scratch.
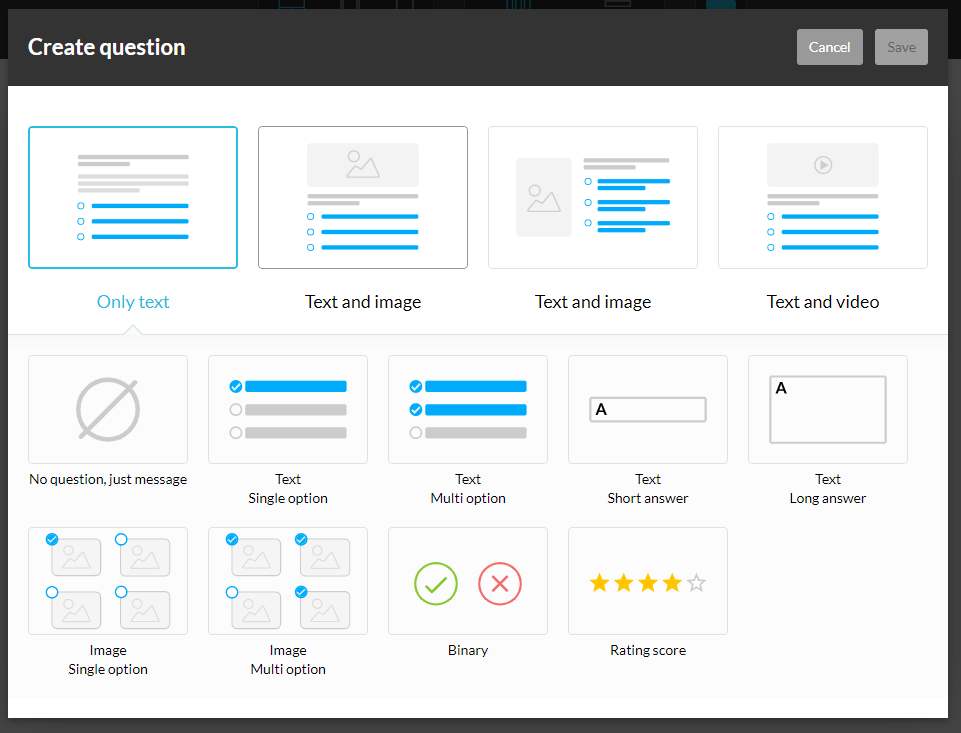
Questions: (Required)
The primary content of the survey is your questions. You can add new questions by clicking the “add question” button on the left panel. Which should then bring up a choice for which type of template you would like to use and the format of your question.
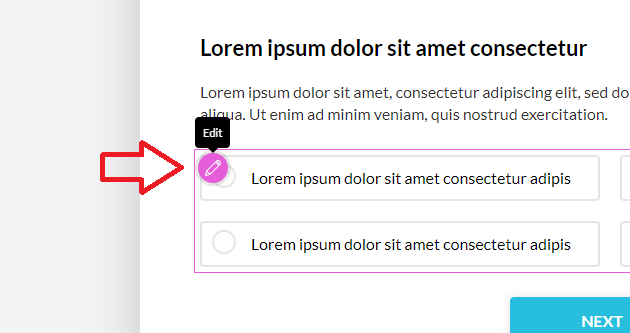
To edit the content you need to click the pencil icon on the component you wish to edit. If not present, you may need to put your mouse over the content to have it display.
*Note: As with our other content, if you delete a component then it cannot be added back in without deleting the entire question and rebuilding it from scratch. So delete components with caution.
If you wish to change the color scheme of your survey buttons and step progress, you can choose a color via the option at the top, as shown here:
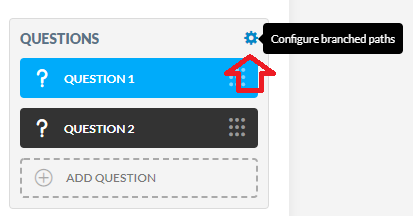
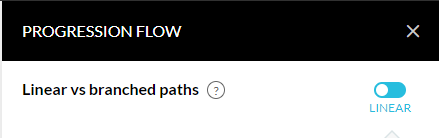
Branched paths: (within Question options)
Though hard to see, our questions feature also has the ability to create diverging paths based on your lead’s choices via the Branch options. This can be accessed by clicking the gear icon on the questions tab.
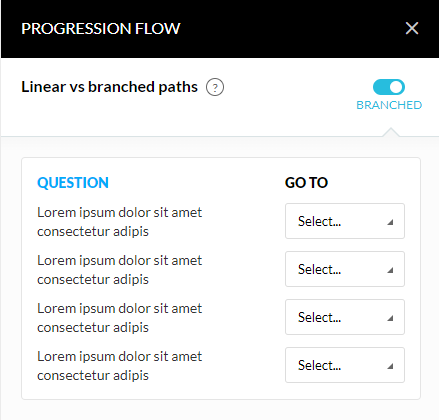
The first option to setup is whether you want to use the default linear progression or switch to the branched path option via this toggle:
If you wish to maintain a linear path, this is where you can toggle your progression bar to be shown or disabled.
If you choose to create branching paths within your Survey, all valid questions will provide a “go to” drop down allowing you to select a new destination.
*Note: You cannot go to external content such as a separate Kartra page or different survey, as the branching path system is merely to navigate different questions within the single survey.
Custom fields: (within Question options)
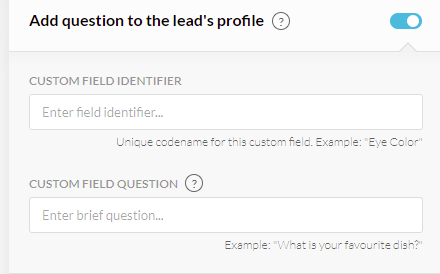
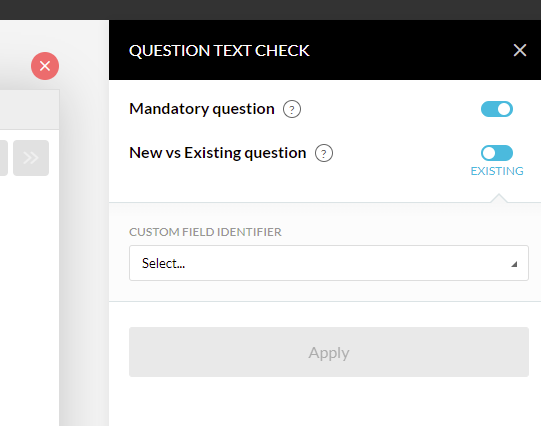
When creating new questions it is possible to have those questions added to a lead’s profile as a custom field. Rather then merely survey data found in survey analytics.
You will either need to create the new custom field via the question’s setup, as shown here: (Turn on the toggle to “Add question to the lead’s profile”)
Or you will need to utilize an already existing field by toggling that choice, as shown here: (The toggle labeled “New vs Existing question”)
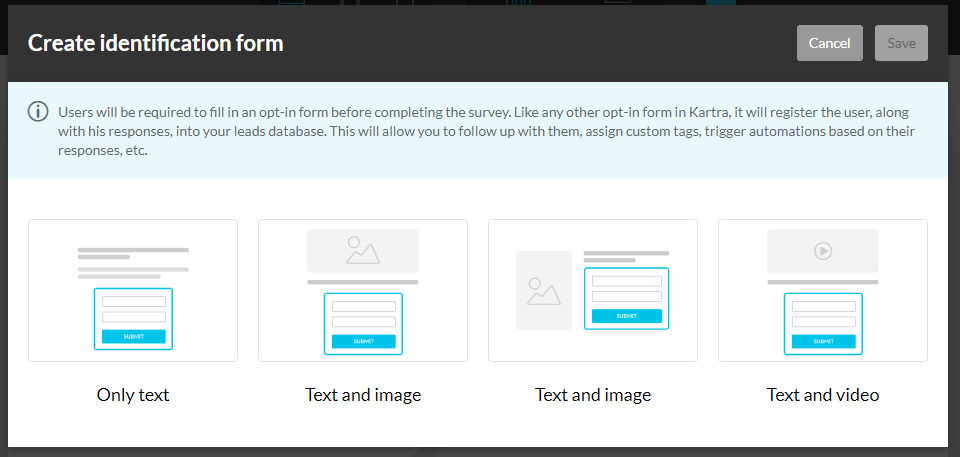
Identification: (Optional)
Identification, similar to the intro cover, is yet another alternative option. This allows you to collect opt-in data from the person you are having fill out the survey. So if you want to get lead information directly from customers who use your survey, then you merely need to turn this option on. Otherwise the data you will receive will just be generic totals and no actual lead information.
*Note: If the customer has bought a product or filled out an opt-in form previously, then data may be assigned to them for the survey even with identification turned off. But this depends on their cookie setup and is not something we would recommend you expect to happen (or not happen). Please turn this feature on if you want to ensure they are generated as a lead in your system.
Similar to the intro cover, you can choose from a variety of display options for how your opt-in form will be presented. Be mindful that customization is limited to this menu selection and any components your remove after this choice cannot be added back in unless you deleted the entire identification setup and start from scratch.
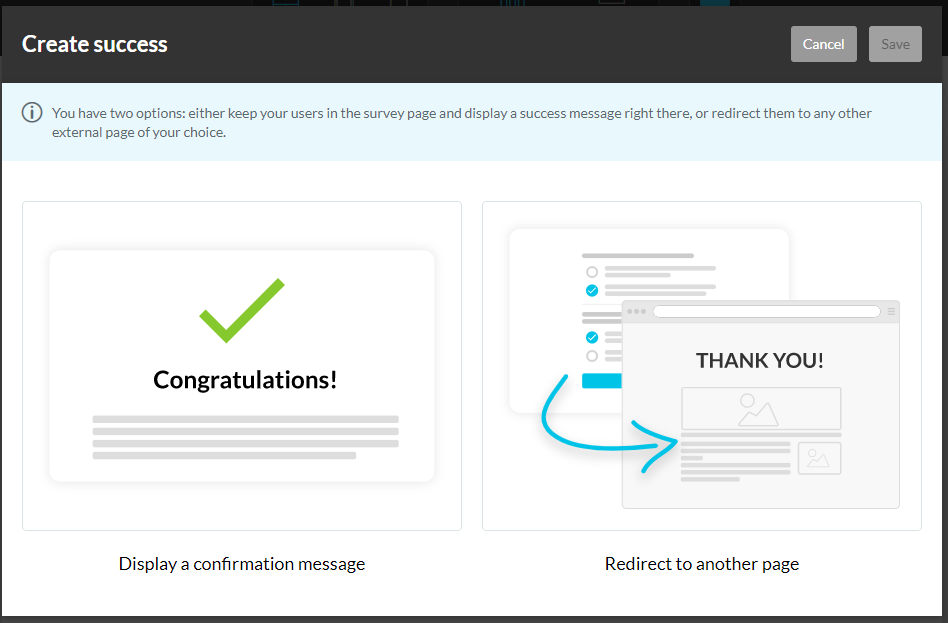
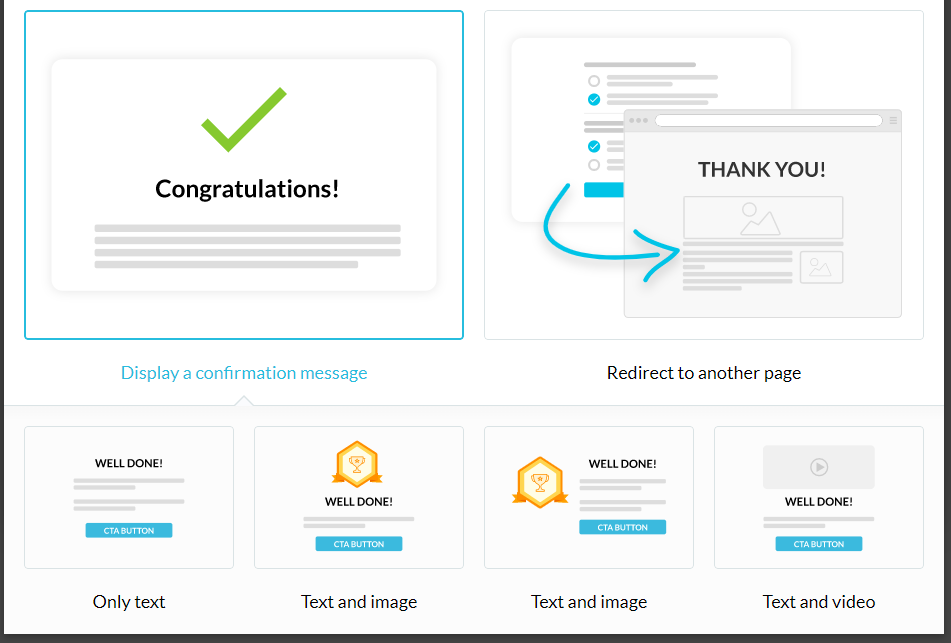
Success: (Required)
At the completion of the survey, your customer will then get one of two possible situations. You can either display a customized confirmation message or you can redirect them to another page.
And just like any other customized section within the survey, you get a choice of a variety of templates to build your final confirmation message if you go with that choice.
*Note: As with other sections, you cannot add components into this feature. If you delete a component and want to undo the action, then you will need to delete the entire confirmation message and create a new one from scratch.
Other features:
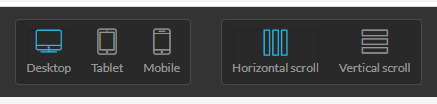
You may have noticed some additional toggles at the top of the screen as shown here:
The toggle for Desktop/Tablet/Mobile will allow you to view your survey as it would be shown on those respective platforms. Allowing you the ability to edit your content until it works on all three platforms to your preferred design.
As for horizontal vs. vertical scroll, horizontal scroll will show each question on a separate tab as you answer them one by one while a vertical scroll will show all your questions at once in a list.
*Note: The progress bar will only show for horizontal scroll, as that is the only feature where you need to know at what step in the survey you are at.
And with that you have completed your survey and can now finish the setup wizard to provide the content to your customers!
It is important to have as much data as possible when executing your marketing campaigns. But sometimes that data can lead to confusion if you do not understand what you are looking at.
To that end lets visit the survey analytics here: https://app.kartra.com/surveys/analytics and take a look at what data we have to offer.
When you visit our analytics you will see two different areas that contain data. A graph shown at the top with a overall representation of all your data (based on the filter options) and a list of each individual survey with their own unique data points.
Visitors:
This is a numerical representation of how many people have visited your survey. This is a unique visitor counter, but it is important to note that if you do not have the user opt-in via the use of the “identification” feature in your surveys then each visit will be considered unique. If identification is turned on, then each visit of that cookied user will be considered one single visit.
*Note: Past visits before the user was opted-in will not all compress into a single data point and will still remain as the unique visitor counts they originally were.
Completed:
Separate from a visitor counter, the completed tally will provide you a detailed account of how many surveys have been completed. This data will also include a percentage ratio that represents the number of unique visitors compared to your completed tally total.
*Note: It is possible for a single person to fill out a survey more then once. Meaning you can have data such as what you see in the image above where visitors will be less then the completed forms giving you a completion percentage higher then 100%. It is important to design your content in a way that will not present your customers with the same survey more then once to ensure this does not happen (unless you want this to happen).
Average time to complete:
As soon as your customer starts to view the survey component itself, a timer will start that will only end when the survey is completed.
Average Score:
The score of a survey will represent how many answers your users filled in correctly as per your “correct answer” mark in the survey builder, compared to the total amount of questions.
*Note: There are survey questions that do not have a right or wrong answer, such as a rating or a written response. In this scenario our system will default these to a “wrong” answer and will count as zero points in a quiz. So for example if you have four multiple choice questions with right and wrong answers followed by a survey rating question, then the maximum score on your survey would be 80%. As your users can only answer four correct answers out of five total questions.
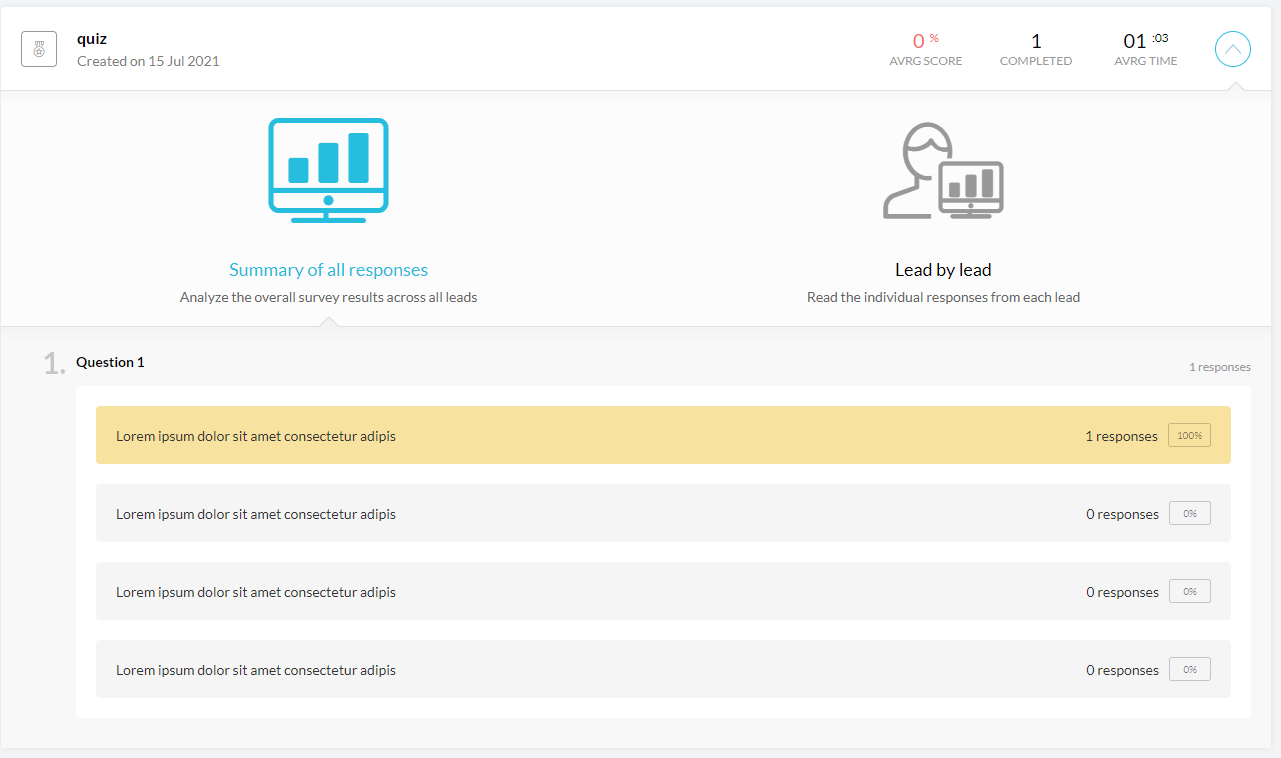
Results:
In addition to general analytics you can find specific totals to all your results via the data shown here: https://app.kartra.com/surveys/analytics/results
Most of the data shown here is the same as the analytics tab, but the new addition is a list of all your questions and a running total of how they were answered. The data specifically showing the number of responses to a question and a percentage representing number of responses for that particular answer vs. number of total responses.
In addition to the summary of all your response, you can parse down to a lead by lead view of the data and how users answered their questions.
This data will also include the option to export a list of all your leads and their responses into a CSV file.