Kartra Documentation Technical Documentation for Kartra

Zoom Meetings

Integrating your Kartra Calendar and your Zoom account will allow you to create zoom meetings for your Kartra Calendar events, instantly adding all scheduled appointments from your Kartra Calendar as meetings in your Zoom account.

*Please Note: You will have the ability to choose which calendars will use Zoom and which calendars will not.

Creating the integration

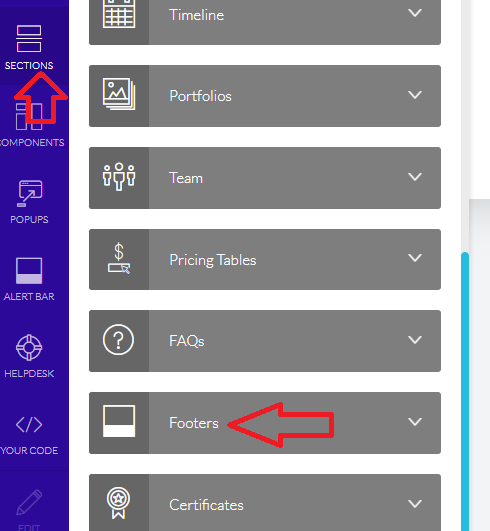
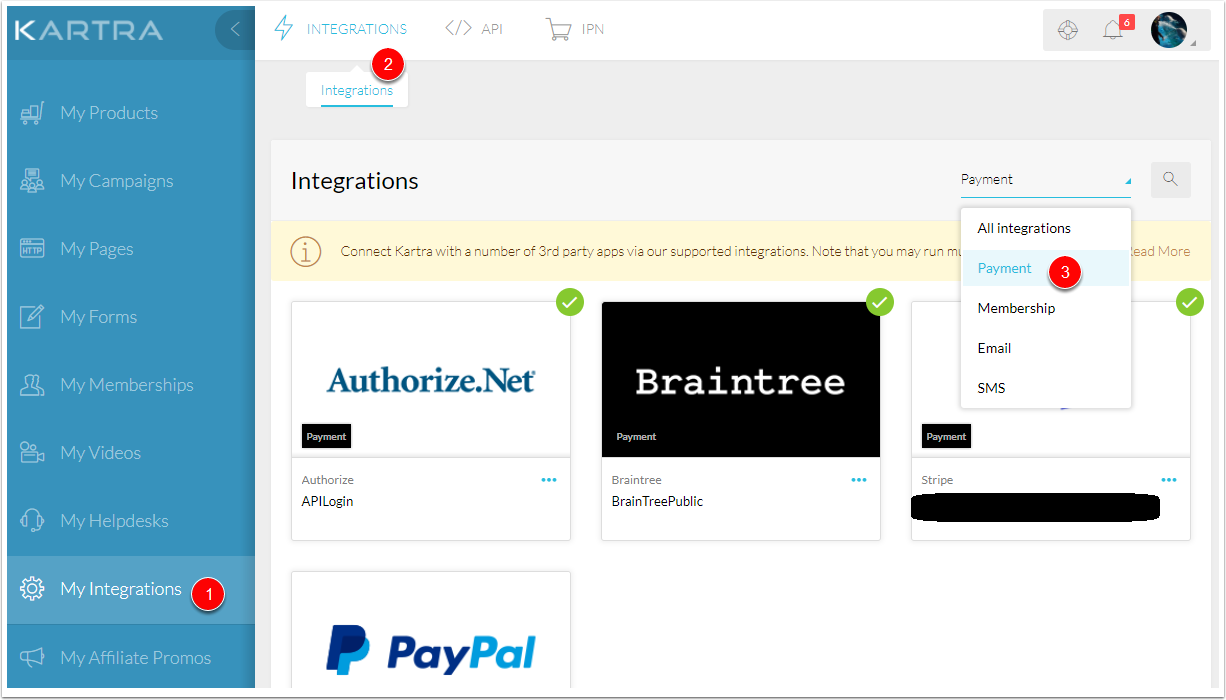
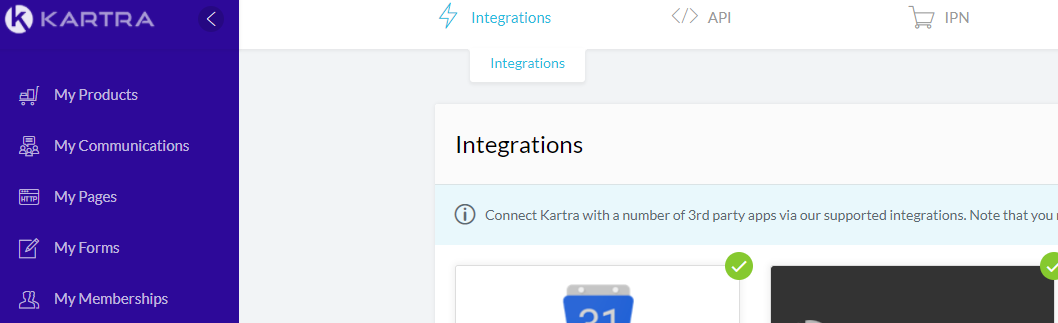
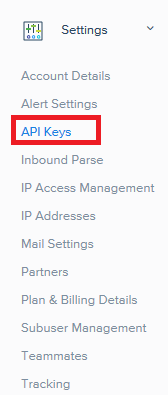
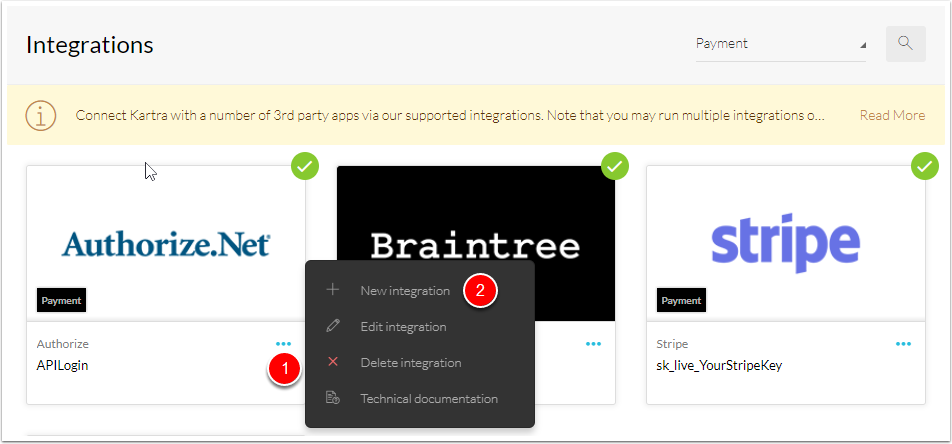
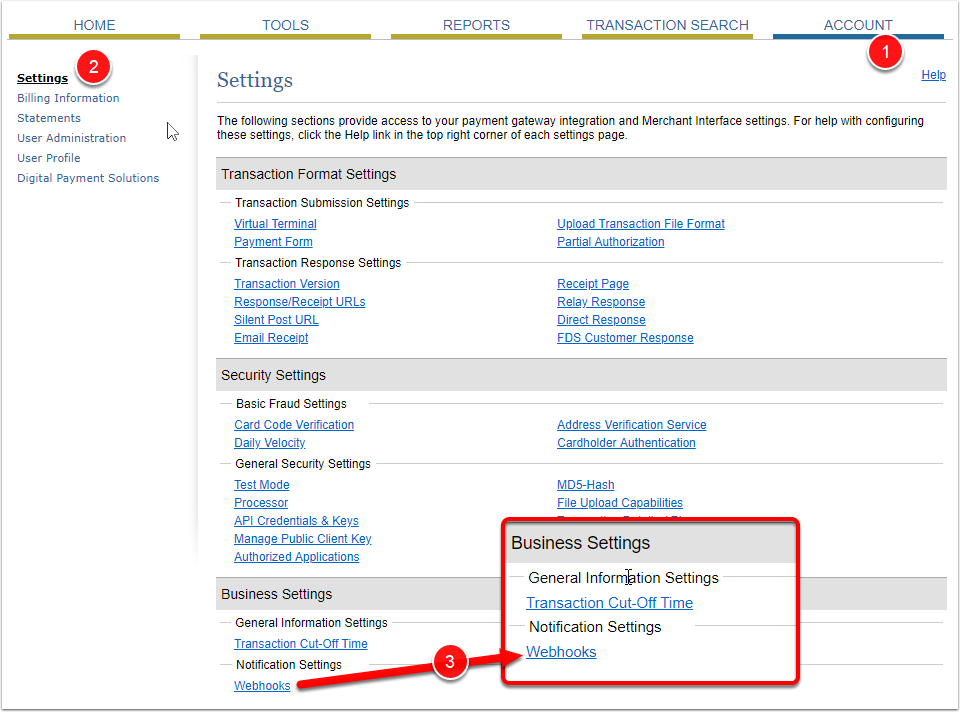
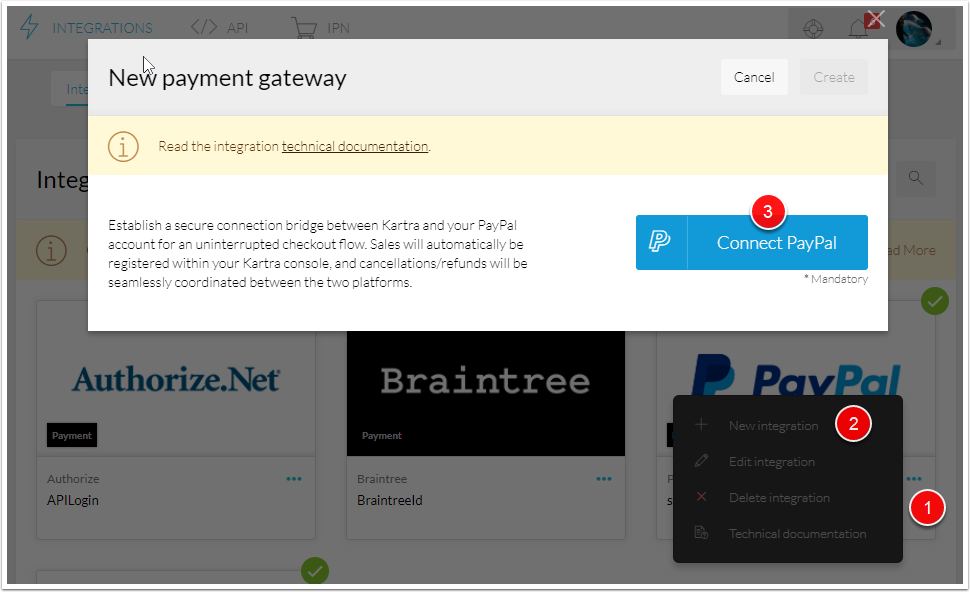
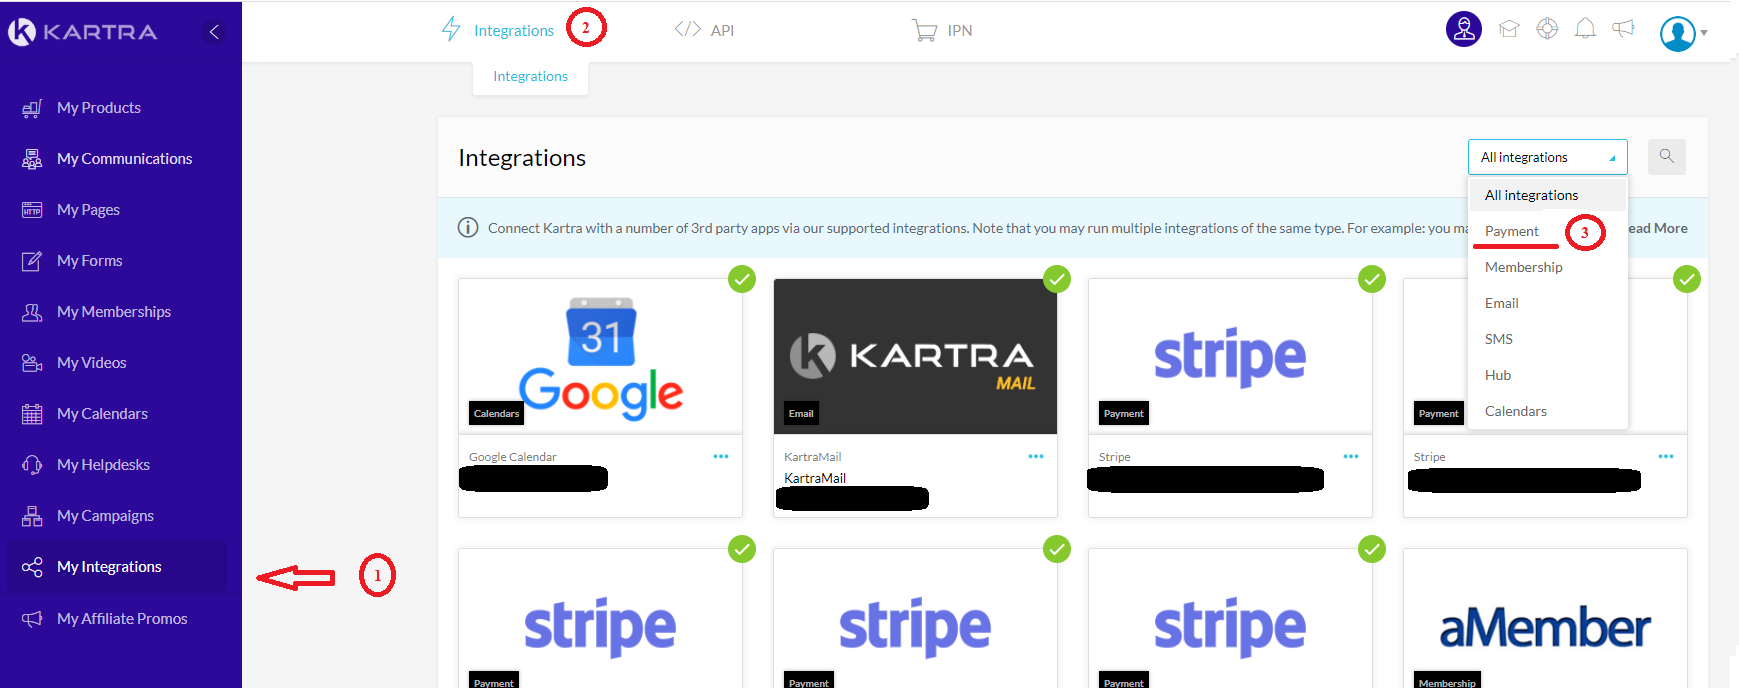
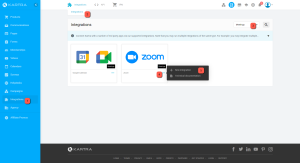
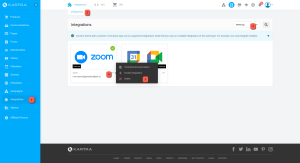
The first thing is to connect your Zoom account and your Kartra account. Go to Integrations (marked #1 Below) in the sidebar menu, and then to Integrations (marked #2 Below).

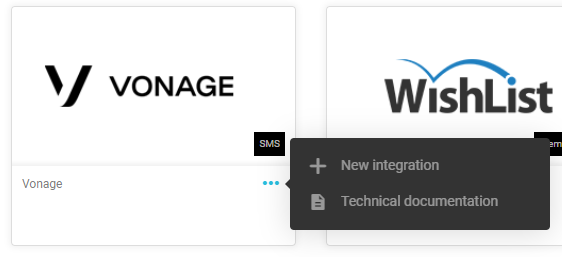
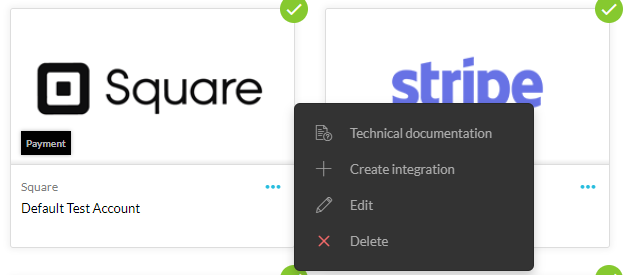
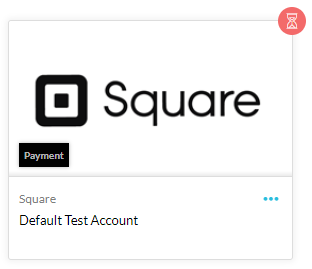
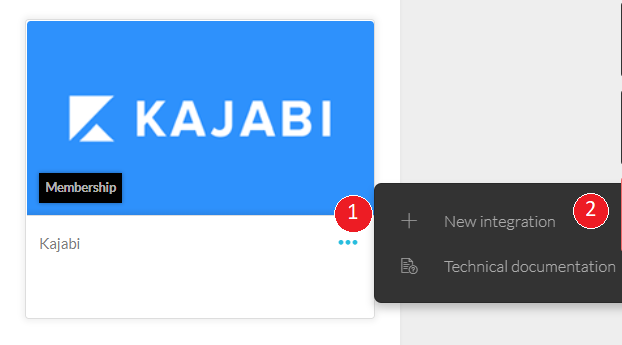
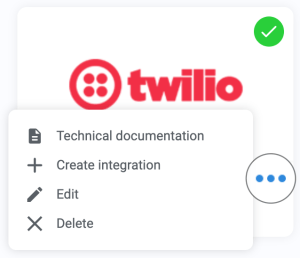
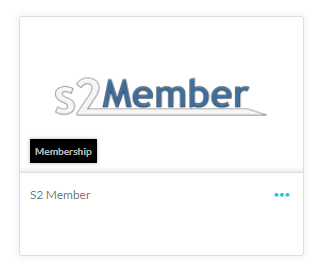
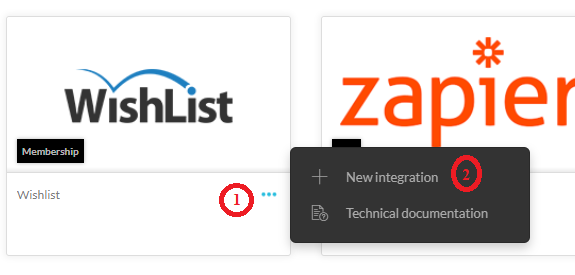
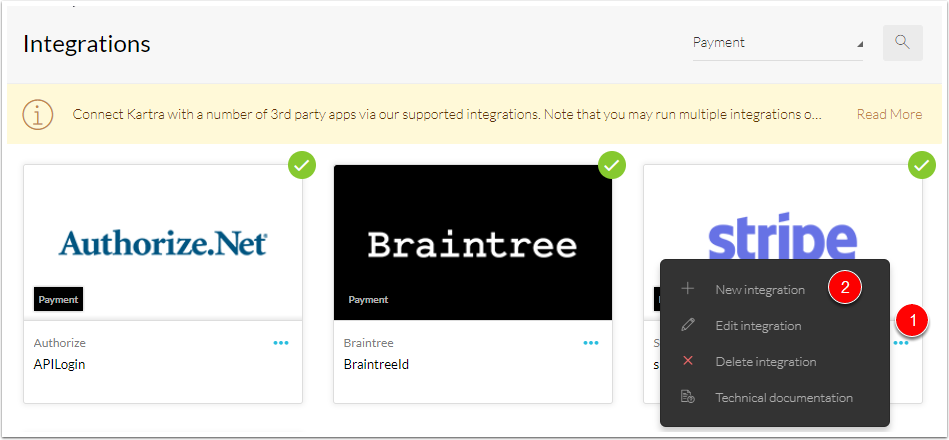
To make things just a bit easier, choose “Meetings” in the drop down (marked #3 Below).  You want to click the three dots (marked #4 Below) under the “Zoom” logo. Then, select “New Integration” (marked #5 Below).

*Please Note: A Zoom account is allowed to be linked only with one Kartra account. You will need to remove the integration to add your Zoom account to another Kartra account.

2023 04 06 14 01 50

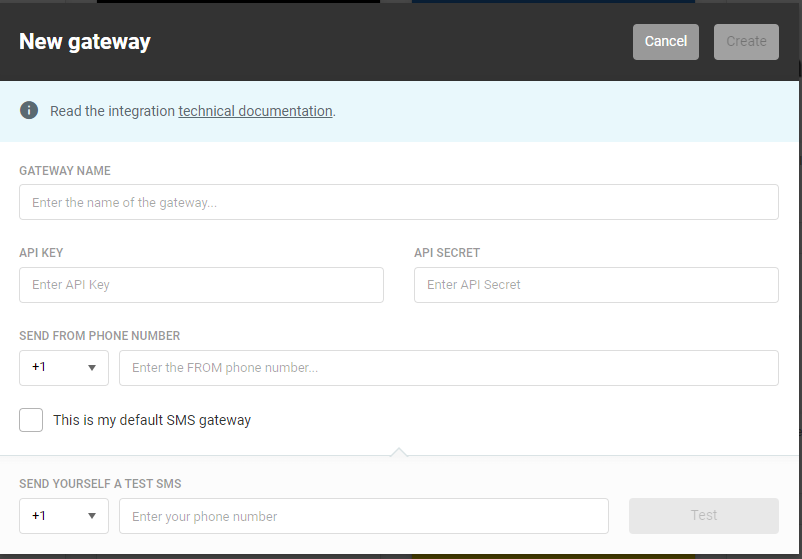
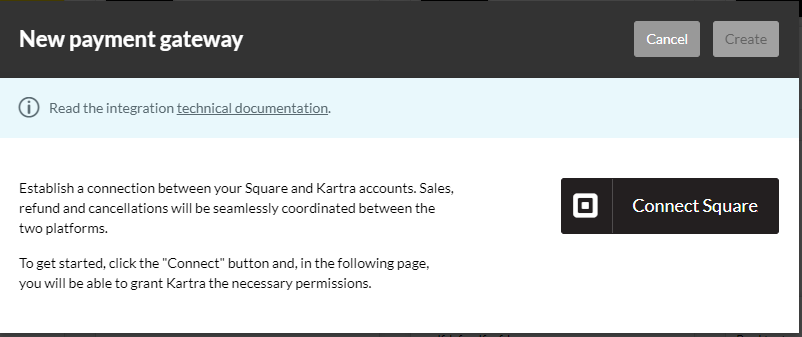
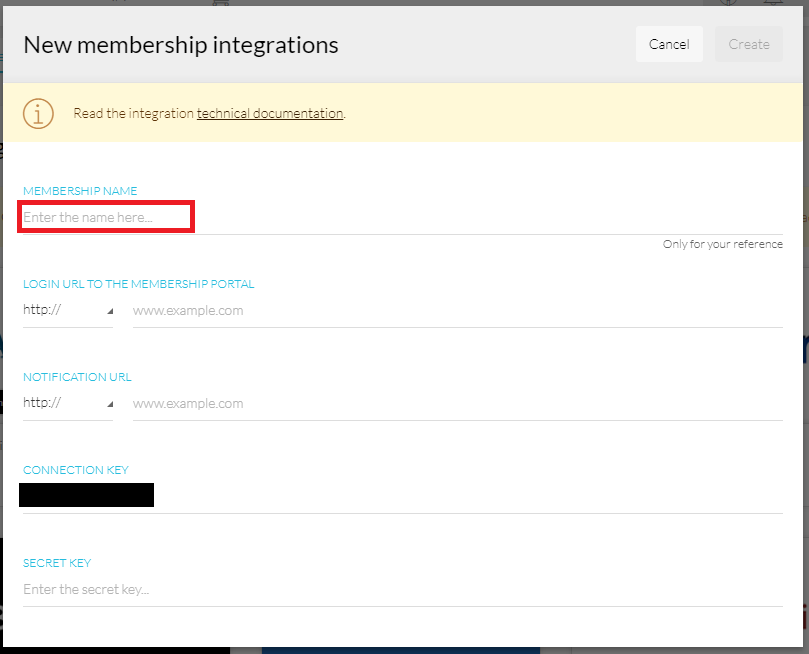
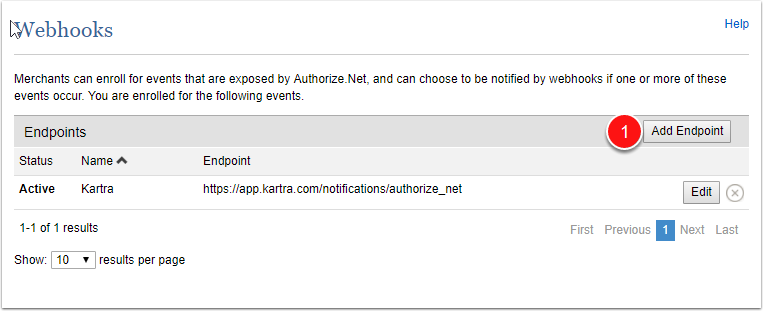
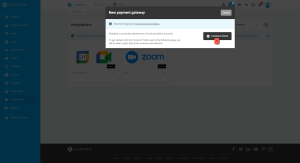
A new popup window will be opened. Go ahead and click on the Connect Zoom button (marked #1 below).

2023 04 06 14 02 55

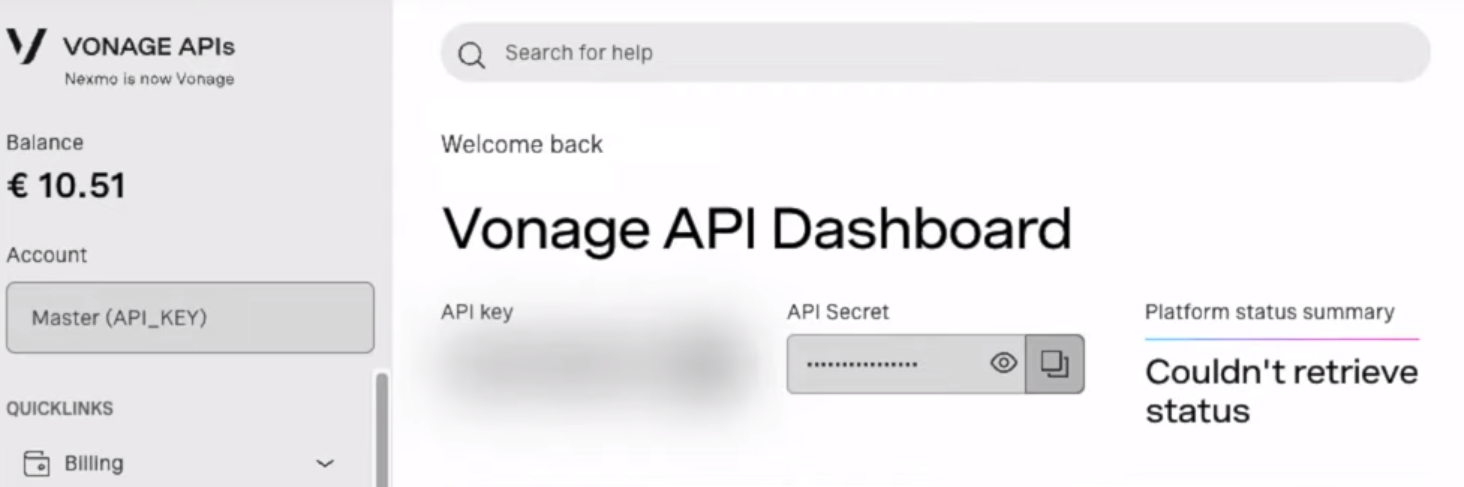
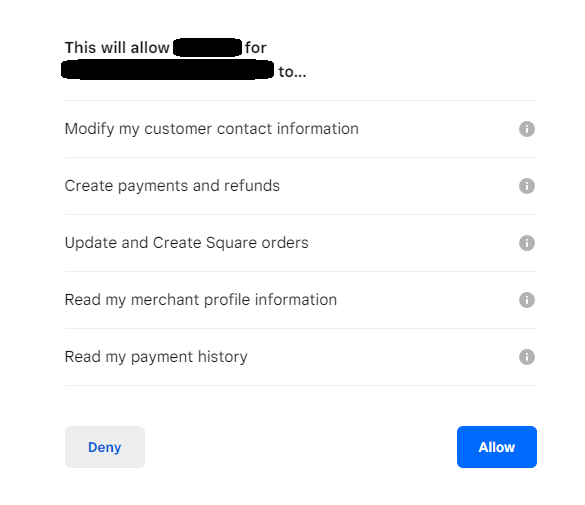
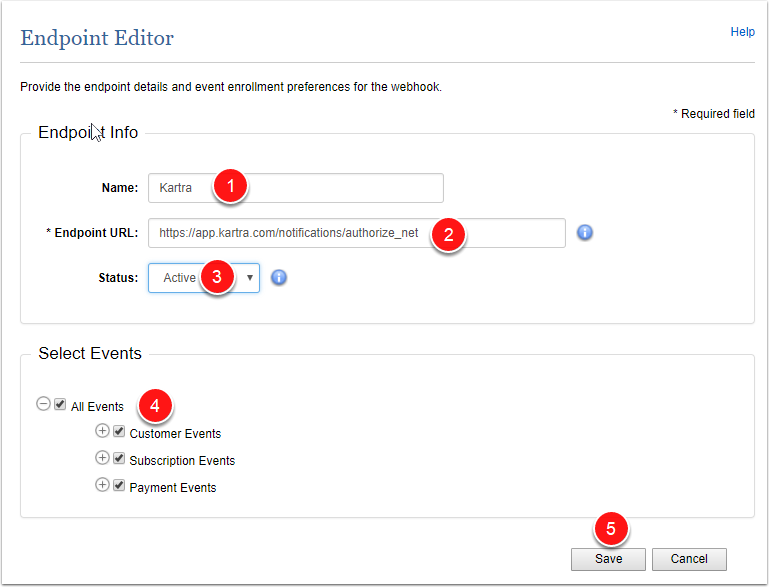
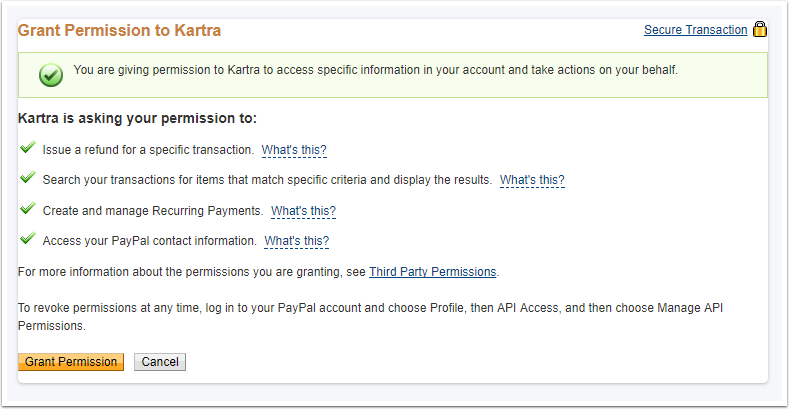
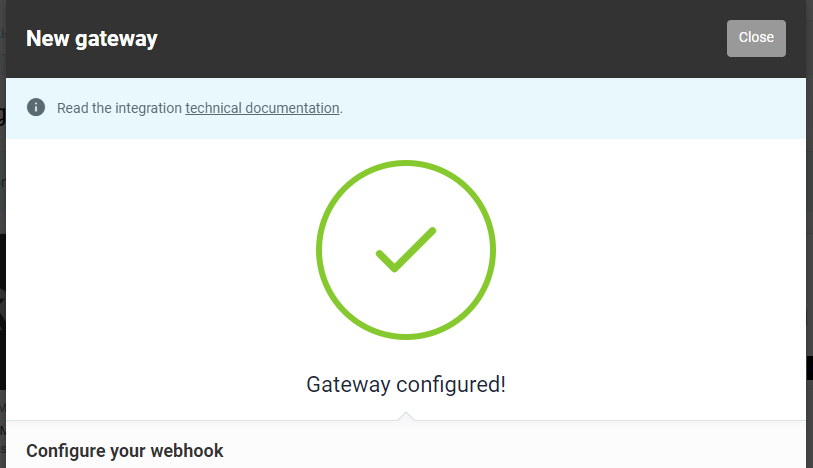
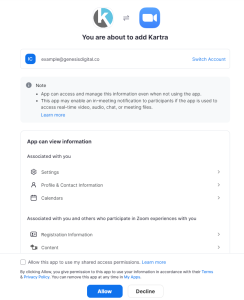
At this point, the system will prompt you to log into your Zoom account, and grant Kartra certain access permissions. This is necessary for Kartra to write meetings into your Zoom account.

Needless to say, Kartra will not be able to read any private information Zoom account. Only the meetings will be accessible by Kartra.

Once the permissions are granted, the integration to your Zoom account will be done!

2023 04 06 14 07 02

Linking the calendar to meetings

After the connection between your Kartra account and your Zoom account is established, we need to define which of your Kartra Calendars should link to your Zoom account.

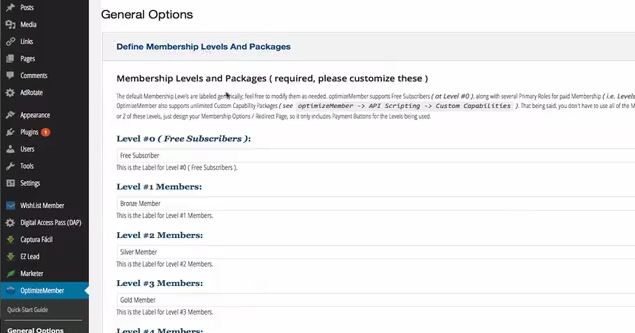
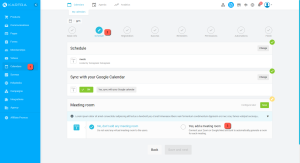
Go to the section Calendars (marked #1 below), edit the specific Kartra calendar you want to connect to your Zoom account, and go to the schedule step in the configuration wizard (marked #2 below).

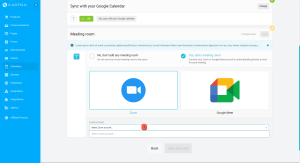
Edit the box and choose “Yes, add a meeting room” (marked #3 below).

2023 04 06 14 30 21

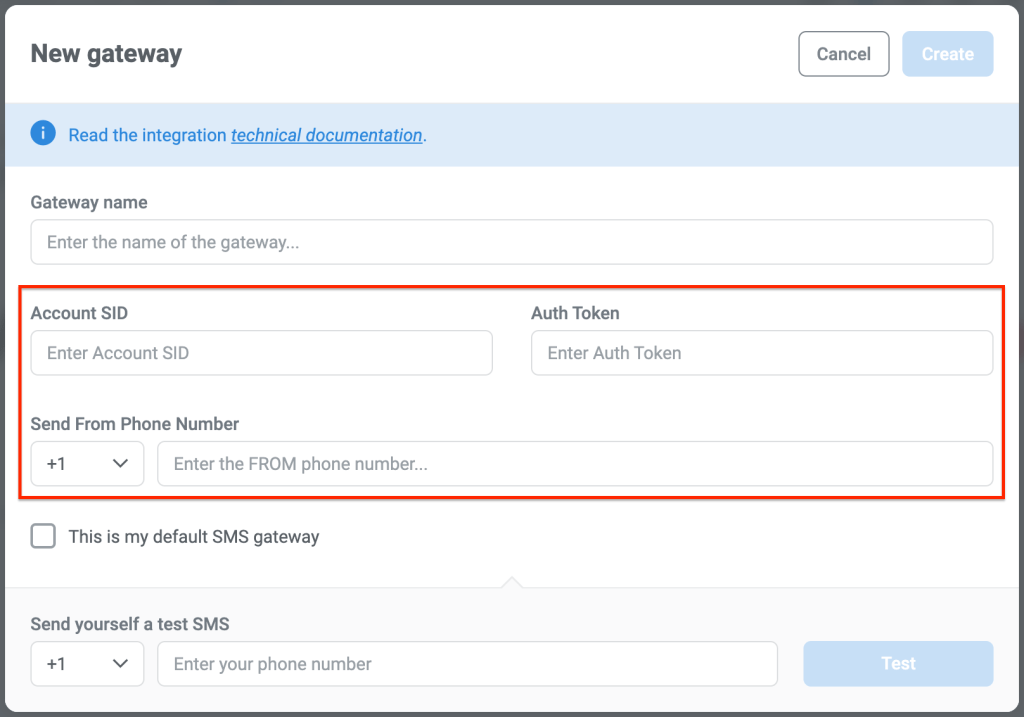
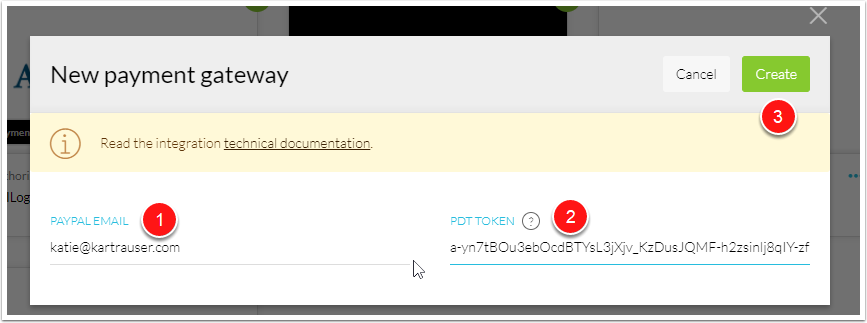
Use the drop-downs to select the particular Zoom integration (marked #1 below) you want to integrate this particular class with, and save the step.

*Please Note: remember that you will be able to establish a different connection for each Class inside your Kartra Calendar. This is useful in case each Class is conducted by a different host/person, and thus allowing each of them to link their respective Class to their respective Zoom account.

2023 04 06 13 57 23

Your integration is finished! From now on, all the events created through your Kartra Calendar will appear in your as meetings in your Zoom account.

Uninstalling The Zoom Integration

In order to delete an existing Zoom integration, go to My Integrations (marked #1 Below) in the sidebar menu, and then to Integrations (marked #2 Below).

Choose “Meetings” in the drop down (marked #3 Below).  You want to click the three dots (marked #4 Below) under the “Zoom” logo. Then, select “Delete” (marked #5 Below).

2023 04 06 14 15 22

Upon deleting the integration, all the meetings created by Kartra in your Zoom account linked to this integration will be deleted.

Vonage

What happened to Nexmo?

It appears the Nexmo SMS software was acquired by Vonage in 2016 and have finished their transition to the new brand in early 2023. To that end we are making sure our API continues to work with the newly branded software and to update our integration to match. No actions are required by our users at this time to migrate to the new brand.

*Please Note: This will mean that sometimes our content may mention Nexmo instead of Vonage, but both should be considered the same software going forward.


Vonage Integration:

Vonage integration will require a API “Key” and API “Secret” code from Vonage to integrate into Kartra.

*Please Note: This means most issues will need to be solved via Vonage and Vonage support, if either of your codes are not working as intended.

To integrate your Vonage SMS gateway you will want to go to the “Integrations” section of Kartra. This can be found in the menu bar on the left hand side of the Kartra interface (usually near the bottom).

Integrations Tab 01

Upon selecting the Vonage option you will be presented with a link to this documentation and the ability to create a new Vonage integration with Kartra (+ New integration). You are allowed to have multiple integrations within your Kartra account.

Vonage 03


You will need to login to Vonage on a separate tab and collect the necessary information within Vonage itself to complete your setup.

After logging into Vonage, the necessary information will be displayed on your front dashboard.

Vonage 01


Your account API Key and API Secret will then be displayed for you to use on their interface.

*Please Note: Vonage may change their website from what appears in this document; but the information required should always be the same and should still be obtainable through their system.

With this information you can then go back to your browser tab that contains Kartra and fill in the required information:

Nexmo 02

You will need to copy the Account API Key and API Secret into the modal window.  In addition you will want to name your SMS gateway as it will display in Kartra and provide a “Send from” phone number. At this point the create option will be enabled. By selecting create you can now finish your Vonage SMS gateway integration. If the button is not enabled and green, then you have not filled in the necessary information to complete your setup.

*Please Note: The “Send from” phone number may not be just some arbitrary number. Often SMS services provide you such a number to work with their system and you will need to inquire with your SMS provider’s support to ensure what phone number you should place here. In other words, this may not be purely aesthetic but is instead part of your setup process.

*Please Note: At this point you should be able to test your SMS feature via the test option at the bottom of the window. Please ensure this feature sends you a message before you “create” your SMS integration. If no message is sent then your setup may have a typo or incorrect information and needs to be updated.

If you are unable to find the necessary information on Vonage please contact Vonage support to acquire what ever information you require.

If your Vonage information does not work via Kartra (and it is confirmed accurate by their support), then please contact Kartra support: Support@kartra.com

Integrations

Within the Kartra software you can integrate a variety of third party external software. This includes various payment, Email, and SMS gateways or you can even link your own custom domain to the Kartra software to replace any Kartra based URLs with your own.

You may also link any third party software to Kartra through our Zapier integration; assuming the third party application you wish to integrate with Kartra also has a Zapier integration.

You can find more details on each of these integrations in our documentation here:

*Please note: Not all integrations have documentation due to the simple nature of the integration. If you cannot find a specific documentation, feel free to reach out to the Kartra customer support to help walk you through any setup you need help with.

Social Media Integrations: overview

Social media integrations, what is this feature?

The Kartra software does not have a dedicated feature to manage social media. However, the already existing features Kartra includes do make use of social media to help with your content.

For example you may see icons such as this show up in your content:

Social Media 01

These make reference to various third-party social media services. (In order of icons shown above)

  • Facebook – A social media service dedicated to family and friend related connections.
  • Twitter – A social media service that allows individuals or groups speak quickly to large amounts of people in short messages.
  • LinkedIn – A social media service dedicated to work related connections and job applications.
  • Instagram – A service dedicated to having users share images and photos.

This documentation will walk you through the expected behaviors of these icons in the various Kartra features. As the functionality will vary from feature to feature.

*Please note: We will not explain what these social media services entail, as the nature of these platforms can change from day to day and how they are used vary from user to user.  And as their content is too vast we ask you reach out to their support channels if you have questions about their features.

Kartra Page builder (Social Media Icons)

The Kartra page builder (Sections / Footers):

The Kartra page builder is a feature you can find within the “My Pages” section of Kartra here: https://app.kartra.com/pages

Though there may be some icons located elsewhere, the most common feature to contain the social media icons will be the page footer.

Page Builder 01

Upon choosing a footer template for your page you can edit the various social media icons by placing your mouse over the icon and clicking one of the three editing options:

Page Builder 02

  1. The first icon allows you to clone the button and create more options.
  2. The pencil icon allows you do edit the button’s details. (Covered in more detail below)
  3. While the X icon will remove the button.

The clone and delete options are self-explanatory. So lets dive into the edit options for one of these social media icons.

There are three primary methods of updating this feature. Including the editing of the icon itself:

Page Builder 03

The ability to add an effect or animation:

Page Builder 04

And finally the most important feature, the ability to choose what behavior your icon will do. Technically this social media feature is not a fully fledged integration (such as an API) and it will behave similar to our “image” options. So if you want the social media icon to actually go to your social media account you will need to ensure you “Link to another page” and put in the URL for your social media content.

Page Builder 05

*Please note: The primary feature of these icons are to take a user to a specific destination just as you would with any normal URL link.


The Kartra page builder (Components / Social Share):

Within the Kartra page builder you can find a variety of social share options within the components area.

Page Builder 06

These features are a bit more complex then the simple URL links you will find in a typical footer as described in the previous instructions. As clicking any one of these features will automatically open the social media platform and allow your viewing lead / customer to share the page they are looking at via that particular platform. These particular buttons also do not allow editing options beyond the deletion of a particular social share icon.

So for example if I am visiting a page and click the Facebook share icon, a separate window will pop-up asking me to login to Facebook (if I am not already logged in). And once logged in, a post will be created that will link to the page where I just came from (the one with these social media icons). Allowing me to share the page with my social media groups with a simple click.

*Please note: The lead must confirm the post before it gets sent out. This feature just does all the work of creating the post for them, to then have them click accept and send to the social media platform they select.

*Please note: The primary feature of these icons is to allow the viewing user to share the page they are currently on (your Kartra page) with a social media service of their choosing as quickly as possible. It assumes they are already a member of that particular platform.

Email Editors (Social Media Icons)

Throughout the Kartra software our users will have the ability to edit emails to send to their users: (As shown in the image below)

Email Editor 01

These emails allow for simple text based functionality all the way up to advanced template design.

In the advanced email options there are a variety of footers and headers that contain social media icons.

Email Editor 02

Similar to the Kartra page builder icons, these merely function as links to a given page. And it is essential to the Kartra user to ensure there is a URL link to the matching content of the social media image.

Email Editor 03

* Please Note: In short, the social media icons in this context behave like an image with a URL shortcut link.

Membership Builder (Social Media Icons)

The membership builder allows our users a wide range of customization. And beyond the most basic image and URL options, the only feature within the membership builder to include social media icons would be the “host” feature.

Memberships allow our users to designate a “host” or “creator” to a given posts content.

Membership Builder 01

One of the features you can turn on and off for this “host” is the ability to have URL links to the host’s social media.

Membership Builder 02

As you would with any image URL, you need to update the URL to contain the appropriate social media.

*Please Note: You must turn on each social media icon one by one to ensure they show within the host window. As turning on the “Show social media Icons” button is not enough on its own.

Videos (Social Media Icons)

Within the Kartra video uploading options, users can add “call to actions” within a given video. This allows various features to pop-up within that video.

Most notably you can add a “Share to unlock” option.

Videos 01

Though it does not use all social media content, this feature asks a viewing lead to share the video on either their twitter account or their Facebook account.

*Please Note: This feature can be set as mandatory. Which would force any viewing leads to share the video in order to see it past the point you designate via this feature.

Surveys (Social Media Icons)

You can find the one instance of social media icons within a Kartra survey in the “congratulations” screen.

Survey Editor 01

Through a toggle you can turn on the social media share feature which allows your users to share their success via the included social media services. Similar to the Kartra page social share options, this feature will create a post within the social media service on behalf of the lead where the lead then just needs to send it off to show their followers.

*Please Note: Unlike the page builder social share that shares the active page the lead is on, you will need to define the URL destination of the share within the survey social media options.

Square

You can now integrate Kartra with Square as a credit card payment gateway option. This is an alternative to Authorize.net, Stripe, and Braintree styles of integration (another Credit Card option). You can sign up for the Square service at their website here: https://squareup.com/

In order to integrate with Square, you will want to click My Integrations (Marked #1 Below) on the sidebar. Then you should be taken to the Integrations tab. If not click Integrations (Marked #2 Below) in the top menu.

To make things just a bit easier, go to the drop down box and choose “Payment” (Marked #3 Below) and this will display all the payment gateway integrations. You will see a green check-mark next to any integrations you have already set up.

Integrations Payment

Each of the Payment Gateways has their own little box. You want to click the three dots under the “Square” logo. This will pull up a black menu that will look similar to below. You want to press “Create Integration”.

Square 03

Now that you’ve pressed “Create Integration” you’ll see a popup like below.

Square 02

Select “Connect Square” and you will be taken to a separate window on the Square website. Follow the on screen instructions from the Square website to provide permission for Kartra to integrate with their service.

This is what the permissions should look like:

Square 04

*Note: These permissions are all required and you cannot “Deny” them unless you do not want to integrate Square.

Afterwards you should be redirected back to Kartra and now your Square service should be a valid credit card option within Kartra!


*Please Note: There are some additional things that may be different from a typical payment gateway setup but are standard for Square.

Your leads and/or customers who visit your checkout will now see a new checkbox unique to Square checkouts: “Save my credit card for future use”

Square 06

Other checkout services can store the customer’s credit card information via the payment processor to allow easy re-use of their information for up-sale purchases. But Square in particular must ask permission for this information from the customer; hence this new checkbox option.

When checked an email will be sent to the customer asking permission to store the credit card information; similar to our double opt-in process for Kartra opt-in forms.

This is a standard behavior with Square and has no customization options. This feature cannot be removed, altered, or changed in any way as long as Square is being utilized.

*Troubleshooting tips:

If you fail an integration with Square you may see a red icon on your Square integration upon a page refresh:
Square 05

Our recommendation would be to delete this integration and just create a new one from scratch.

If you have any other issues with your setup please take a screen capture of the errors you are seeing and/or the location where you are stuck. Then reach out to our support team with those details: https://home.kartra.com/contact

Custom support email forwarding

If you look to streamline the interaction between your customers and your support agents, you might want to go for the seamless email integration instead of the traditional helpdesk portal.

The benefit of this feature is that it allows you to simply give your users a support email address (for example support@YourDomain.com), and any message received at that address will be immediately forwarded to your Kartra Helpdesk ticket system for your support staff to handle. To be more specific…

  • If the user emails directly at support@YourDomain.com and thus it’s a brand new conversation, the system will create a new ticket inside your Kartra Helpdesk so your support staff can read it from there.
  • If, on the other hand, your user replies to an email that already belongs to an existing conversation thread, the system will add it up to the corresponding ticket.

In short: your users will simply interact via a traditional email conversation, whereas your support agents will receive and address them via a well organized ticket system. Best of both worlds!


Configuring the Helpdesk wizard

Inside the Helpdesk configuration wizard, at the Communications step, you will find the two options: Seamless Email Communication and Force Helpdesk Communication.

65

As you tick on the Seamless Email Communication option, you will notice four key configuration fields:

  1. Your desired support email:
    • This is the actual email address you want as your support email. Your users will be able to mail this address and Kartra will automatically generate a Helpdesk ticket with the user information, the email message, etc.
    • Furthermore, whenever you add a new post to the ticket, the user will receive your response from this email address.
    • Should the user reply once again, the system will add it to the ticket thread so the conversation may continue.
    • Please note that you must own this email address in your domain. For example: support@YourDomain.com..
  2. Sent from: The name or company name you want to be displayed as the email sender.
  3. Default department: When a user sends an email that is not a reply to an existing support conversation, the system will not add the message to any existing ticket thread. Instead, it will open a brand new ticket altogether under this default department.
  4. Our forward email address: This is the unique email address you must forward support@YourDomain.com. Every single Kartra Helpdesk has a unique email address so there’s no mix up. Let’s review this email forwarding process in further detail below.


Forwarding emails

The key to this whole setup is to create a forwarding rule from Your Desired Support Email to Our Forward Email Address. You see, Kartra must be able to receive every incoming email from your users in order to parse them and add them to the ticketing system. That’s where the forwarding rule comes in play.

Every email provider has a different interface when it comes to set up the forwarding rule, but ultimately they all work in the same way. In the screenshot below, you can see how to set it up in Gmail, and it shouldn’t be too different for your specific email provider.

68

Sometimes, if your email is hosted by Google or Gsuite, they might ask you to confirm that you indeed want to activate the forwarding rule. To that extent, you will receive a code at your email address (even though Google’s interface might say that they’ll send it to our email address). When that confirmation email arrives, grab that code and paste it in the box and click “verify” as shown in the screenshot below.

Note that the confirmation email is a bit slow and it can take up to 10 minutes to arrive.

95


Customizing the email notification

At the My Account -> Email Notification section of your Kartra account (see screenshot below), you will find two email notification templates:

  • Helpdesk reply to lead (via helpdesk thread)
  • Helpdesk reply to lead (via email thread)

69

Each of them will trigger a different email notification to your users, depending on whether the Helpdesk interaction is configured to happen via the ticket system or via email communications.

If you edit the template for the email communication, you will see the dynamic tag {helpdesk_vendor_reply}, which will be replaced by your support agent’s response as typed from the ticket thread. Moreover, you will see the typical “Reply above this line” separator. You may edit the “Replay above this line” text as you please, but make sure your user understands that he needs to type his response above the line.

70

Google Calendars

Integrating your Kartra Calendar and your Google Calendar will keep them both perfectly in sync:

  1. Instantly duplicate all scheduled appointments from your Kartra Calendar into your Google Calendar.
  2. Block out in your Kartra Calendar any appointment date/time you might reserve in your Google Calendar.

Image0

Creating the integration

The first thing is to connect your Google account and your Kartra account. Go to My Integrations (marked #1 Below) in the sidebar menu, and then to Integrations (marked #2 Below).

To make things just a bit easier, choose “Calendars” in the drop down (marked #3 Below).  You want to click the three dots (marked #4 Below) under the “Google” logo. Then, select “New Integration” (marked #5 Below).

Integration image

A new popup window will be opened. Go ahead and click on the Connect Google button (marked #1 below).

Image2

At this point, the system will prompt you to log into your Google account, and grant Kartra certain access permissions. This is necessary for Kartra to both write and read events from your Google Calendar.

Needless to say, Kartra will not be able to read any private information or email history from your Google account. Only the appointments in your Google Calendars will be accessible by Kartra.

Once the permissions are granted, the integration to your Google Calendar will be done!

Image3

Linking both calendars

Now that the connection between your Kartra account and your Google account is established, we need define which of your Kartra Calendars should link to which of your Google Calendars.

Go to the section My Calendars (marked #1 below), edit the specific Kartra calendar you want to connect to your Google Calendar, and go to the automation step in the configuration wizard (marked #2 below).

Edit the box and choose “Yes, sync with an external calendar” (marked #3 below).

Image4

Now, use the dropdowns to select the particular Google integration (marked #1 below) and the particular Google Calendar (marked #2 below) you want to integrate this particular class with, and save the step.

IMPORTANT: remember that you will be able to establish a different connection for each Class inside your Kartra Calendar. This is useful in case each Class is conducted by a different host/person, and thus allowing each of them to link their respective Class to their respective Google Calendar.

Image5

Your integration is finished! From now on, all the events created through your Kartra Calendar will appear in your Google Calendar. Furthermore, when an event is created directly in your Google Calendar, they will be blocked in your Kartra Calendar.

Kajabi

Before We Get Started…

First of all, Kartra integrates with the New Kajabi, not the so-called Classic Kajabi, which is not supported anymore in terms of integrations with 3rd parties.

The Kajabi membership integration into Kartra will require an API Key, API Secret and Offer ID from Kajabi. You will all those credentials from within your Kajabi account. If you have any trouble finding them, the folks at Kajabi support will point you in the right direction.


The Integrations Section

These Integrations are available by going to “My Integrations” on the sidebar, you may need to click “Integrations” from the top menu as well. There are a number of integrations available, but you can quickly sort out membership integrations by clicking “Membership” from the drop down.

Kartra Memberships Integrations

From the list of Membership Integrations, look for Kajabi.  Click the dots icon (marked #1 Below) and select “New integration” (Marked #2 Below).

2018 04 24 1624

Getting Your Kajabi API Key and API Secret

To collect your API Key and API Secret: You will need to login to Kajabi on a separate tab and collect the key from the account details within Kajabi.

After logging into Kajabi, navigate in the following order: Settings -> Account Settings -> Account Details

2018 04 24 1712 768x337


NOTE: Kajabi may change their website from what appears in this document; but there should still be an API section with the information. Scroll down the page until you reach the section where it displays your API key and API Secret:

2018 04 24 1708 1 768x347

Getting Your Kajabi Offer ID

In the Kajabi account navigate in the following order: Products -> Offers and edit the desired offer:

2018 04 24 1750 768x354


After that, you can actually grab the Offer ID from the url :

2018 04 24 1802 768x414


How Do I Connect To Kajabi?

Now that you have all your Kajabi credentials, go back to Kartra.

First, you will want to give your Kajabi Membership level a name (Marked #1 Below). This is for your use only, but you will want something that is easy for you to recognize so you know which site and membership level this integration is.

2018 04 24 1805


Now paste your Kajabi “API Key”, “API Seret” and “Offer ID” into the integration window (Marked #2, #3 and #4 respectively, above).

At this point the create button should be enabled (Marked #5 Above), press to finish your Kajabi membership integration. Congratulations, you’re done!


FINAL NOTES:

  1. If you are unable to find the “API Key” and “API Secret” on Kajabi or have any other issues with collecting the API information, please contact Kajabi support.
  2. If, upon double confirming your Kajabi credentials and verifying you’ve entered them in the correct fields, the integration still wouldn’t work, please contact Kartra support.


Plivo

Plivo integration will require a account Auth. ID and Auth. Token from Plivo to integrate into Kartra.

Please Note: This means most issues dealing with these codes will need to be solved via Plivo and Plivo support.

The first step in setting up your Plivo integration will be to access the “+ New integration” option within the Plivo setup:

Plivo Logo 05


Upon creating a new Plivo integration you will be prompted with a screen to input your Plivo data:

Plivo 02


You will need to login to Plivo on a separate tab and collect the necessary information within Plivo.

After logging into Plivo, the necessary information will be displayed on your front dashboard or various other locations within Plivo.

Plivo 03


Your account Auth. ID and your token will then be displayed for you to use.

Please Note: Plivo may change their website from what appears in this document; but the information should still be obtainable through their system.

Meanwhile on the original tab with Kartra, you will need to copy the Account Auth. ID and Auth. Token into the modal window.  At this point the create option will enabled. By selecting create you can now finish your Plivo SMS gateway integration. If the create button is not lit up in green, then you have not completed filling in the necessary information.

Please Note: The “Send from” number is often generated by your SMS provider and sometimes cannot be an arbitrary number. Please check your SMS provider for details on what your “Send from” number should be.

If you are unable to find the necessary information (such as Authorization ID or token) on Plivo, please contact Plivo support.

If your Plivo Auth. ID and/or Token does not work via Kartra (but is accurate according to Plivo support), please contact Kartra support: Support@kartra.com

Twilio

Integrate with Twilio to send SMS broadcasts from Kartra.

You Will Need:

  • A Twilio account
  • The Twilio Account SID and Auth Token
  • A Twilio phone number

Set Up Twilio

  1. Go to Twilio and log in or create a new account.
    • Trial accounts allow message sending to verified numbers in specific countries only.
  2. In the account Console, click Get a phone number or go to Phone Numbers > Manage to create one.
    • Important: Verify the phone number if required. Unverified phone numbers cannot be used to send notifications.

In the account Console, get the information you need to integrate with Kartra:

  • Account SID
  • Auth Token
  • Twilio phone number appears in the Account Info (next image) when the number is created

Twilio account SID and auth token

If you are unable to find the Account SID or Auth Token in your Twilio account, please contact Twilio support.


Integrate Twilio with Kartra

Connect Twilio with your Kartra account to enable SMS broadcasting.

  1. In Kartra, go to Integrations
  2. Search for Twilio or use the drop-down filter field to see SMS integrations
    Create a new Twilio integration
  3. Click the three dots on the Twilio tile and select + Create integration (shown in the preceding image)
    • A green check mark appears if there is already an integration configured. Edit the existing integration if desired instead of creating a new one.
  4. Configure the new SMS gateway:
    Add Twilio credentials to the integration configuration

    • Name the gateway (this is for your reference only)
    • Account SID
    • Auth Token
    • Twilio Phone Number (do not include dashes in the phone number)
      • Important: The send-from phone number must be issued and activated in the Twilio account. The phone number is an important component of the SMS serviceany number will not work here.
  5. Send a test SMS to verify that the credentials are correct. Enter your valid mobile phone number and click Test.
  6. If the test is successful, click Create to save the integration

Troubleshoot Twilio Sending

Countries outside of the United States

If you are in a country outside of the United States, you may need to enable global permissions and the country or number range to which you want to send SMS messages. Twilio has global permissions to protect your account from abuse.

  • In your Twilio account, look for SMS Geo Permissions

Recipients don’t receive messages

If the Twilio message log says your messages were sent, the delivery failure may be due to the phone provider. Providers may block certain types of messages or numbers to protect their customers from spam.

If you just created your Twilio account, you may need to confirm your account. If you need help, contact the Twilio support team.

MailGun

MailGun integration will require a API key from MailGun to integrate into Kartra.

*Please Note: This means most issues will need to be solved via MailGun and MailGun support.

Upon selecting the MailGun tab within the email gateway model window you will be presented with the following.

Mailgun 04


*Please Note: Unlike other email gateways you may notice there is a “Domain region”. Depending on the region of your MailGun gateway setup you will have to set the region via this drop-down to match your own region.

You will need to login to MailGun on a separate tab and collect the key from the API options within MailGun.

After logging into MailGun, select the domain tab, and then select the domain you wish to use.

Mailgun 01


You will then be presented with the domain information which will include your “API Base URL” or your domain and your API key.

Mailgun 02

*Please Note: MailGun may change their website from what appears in this document; but there should still be an API section with the key information. If you cannot find your MailGun API Keys, please contact MailGun support.


*IMPORTANT NOTE: There is one final check you must do inside your MailGun account.

Go to the “Domains” section, and turn all their Tracking Settings to OFF mode. The reason for that is because MailGun will inject their tracking codes into your Kartra emails which will mess up your email contents, links, etc. These analytics can still be collected within your Kartra analytics, but your MailGun analytics may be inaccurate when this is disabled.

Mailgun 05

Now you’re finally done in MailGun, and it’s time to return to your Kartra interface within the MailGun integration window. Here, you will need to copy the “API Key” and “domain”.

At this point the create option will enabled. By selecting create you can now finish your MailGun email gateway integration.

Elastic Email

Elastic Email integration will require a API key from Elastic Email to integrate into Kartra.

*Please Note: This means most issues will need to be solved via Elastic Email and Elastic Email support.

Upon selecting the Elastic Email tab within the email gateway model window you will be presented with the following.

ElasticEmail 01


You will need to login to Elastic Email on a separate tab and collect the key from the API options within Elastic Email.

After logging into Elastic Email, select the setting menu option, and then select the SMTP/API tab within the menu options.

ElasticEmail 02

*Please Note: Elastic Email may change their website from what appears in this document; but there should still be an API section with the key information.

Meanwhile on the original tab with Kartra, you will need to copy the “API Key” into the modal window.  At this point the create option will enabled. By selecting create you can now finish your Elastic Email email gateway integration.


If you are unable to find the “API Key” on Elastic Email or have issues with utilizing the webhook on Elastic Email, please contact Elastic Email support.

If your Elastic Email API Key does not work via Kartra, please contact Kartra support.

PostMark

PostMark integration will require a API key from PostMark to integrate into Kartra.

*Please Note: This means most issues will need to be solved via PostMark and PostMark support.

Upon selecting the PostMark tab within the email gateway model window you will be presented with the following.

Postmark 02


You will need to login to PostMark on a separate tab and collect the key from the API options within PostMark.

After logging into PostMark, select the server you wish to use, and then select the Credentials tab within the menu options.

Postmark 01


*Please Note: PostMark may change their website from what appears in this document; but there should still be an API section with the key information.

Meanwhile on the original tab with Kartra, you will need to copy the “API Key” into the modal window.  At this point the create option will enabled. By selecting create you can now finish your PostMark email gateway integration.

If you are unable to find the “API Key” on PostMark or have issues with utilizing the webhook on PostMark, please contact PostMark support.

If your PostMark API Key does not work via Kartra, please contact Kartra support.


*Important Note: What about message streams?

If you were informed by PostMark support that there is an issue with your Kartra setup due to a lack of message streams in our integration, then we want to clarify that Kartra is in fact using message streams contrary to what they may have said. This is a simple misunderstanding as our documentation above does not mention message streams on purpose.

Under most situations with third party programs such as ours, the user (such as yourself) will be the one clarifying what a message contains and hence would need to input the message stream details within an integration to PostMark.

Kartra however does not need to do this because we separate all the different types of emails within our system interface already. Such as purchases, broadcasts, notifications, and etc. So we have already identified which streams need to go to which emails and automatically handle it on the back end so our users do not need to worry about it.

So if PostMark support says Kartra is the cause of your issue due to lack of a “message stream”, please direct them to this documentation or support team (support@kartra.com) to clarify that we do in fact have message streams and they should be unique to each type of email and content coming from your account based on their contents.

SendGrid

Sendgrid integration will require a API key from Sendgrid to integrate into Kartra.

*Please Note: This means most issues will need to be solved via Sendgrid and Sendgrid support.

Upon selecting the Sendgrid tab within the email gateway model window you will be presented with the following.

SendGrid 03


You will need to login to Sendgrid on a separate tab and collect the key from the API options within Sendgrid.

After logging into Sendgrid, select the API Keys option within the menu options.

SendGrid 01


Then you will create an API key with any name you wish to utilize by selected create API.  Your API key will then be displayed for your use.

SendGrid 02


*Please Note: Sendgrid may change their website from what appears in this document; but there should still be an API section with the key information.

Meanwhile on the original tab with Kartra, you will need to copy the “API Key” into the modal window.  At this point the create option will enabled. By selecting create you can now finish your Sendgrid email gateway integration.

If you are unable to find the “API Key” on Sendgrid or have issues with utilizing the webhook on Sendgrid, please contact Sendgrid support.

If your Sendgrid API Key does not work via Kartra, please contact Kartra support.

OptimizePress 2

Integrating OptimizePress 2 into Kartra will require a three components from OptimizePress 2:

  • 1. An API key
  • 2. The URL for the OptimizePress 2 installation.
  • 3. Membership ID: the Kartra/OptimizePress integration is specific to a single membership access level, so we recommend you to create a new integration for each access level you wish to add to your membership.  As a result, each integration will require its unique membership ID from OptimizePress 2.


In Kartra, when you click the New Integration option for OptimizePress 2, you will see the following fields:

2018 09 05 1750

OptimizePress 2 is based on WordPress. As such, you need to enter the URL pointing to the exact place where WordPress has been installed in your domain. For example: http://yourdomain.com/wordpress/ or http://wordpress.yourdomain.com or whatever it might be. Copy that into the “URL to OptimizePress 2 integration” section.

2018 09 05 1753


Here’s how to collect your OptimizePress 2 API key:

At the Add-On section in your WordPress, select the following options: OptimizeMember -> API / Scripting -> Pro API for remote operations.

Note: OptimizePress 2 and/or WordPress may have change their interface by the time you read this documentation, but there should still be an API section with the key information.

From there, copy the API key from the Pro API for remote operations.


Once you have the API, go back to the original tab with Kartra, you will need to copy the “API Key” into the modal window.

2018 09 05 1802


Since this integration will be specific to a pre-designated Membership level,  you will need to specify that Membership ID.

2018 09 05 1803


To find the Membership ID, go back to Add-Ons in your WordPress.  First select “General Options” and then “Define Membership Levels and Packages”.

Example: If you want to use Level #0 (Free Subscribers) the membership ID will be 0.  Level #1 will be Membership ID 1.  And so on…


Final step: revoking access!

While a membership level is usually granted upon a purchase, it is also necessary to have a default action in case the customer cancels/refunds that very purchase. OptimizePress offers two options in this regard: delete or downgrade.


Deleting will, obviously, delete the user altogether.  However, a downgrade will set the user to another membership ID of your choice.


And… that it’s! Just save your settings and the integration should be completed!

S2 Member

S2Member membership integration into Kartra will require an API key from S2Member, a URL to the membership portal provided by S2Member, and the URL for the S2Member integration, and a membership ID (level).  You will need to create a separate integration per each membership level that you have set up. This will allow you to sell each level independently.

NOTE: This integration means most issues will need to be solved via S2 Member and S2Member support.

Kartra has the ability to integrate with a few different membership systems; aMember v4, DAP, OptimizePress 2, S2Member and Wishlist.

These Integrations are available by going to “My Integrations” on the sidebar, you may need to click “Integrations” from the top menu as well. There are a number of integrations available, but you can quickly sort out membership integrations by clicking “Membership” from the drop-down.

Kartra Memberships Integrations

From the list of Membership Integrations, you will look for S2Member.  Press the dots  and you will be presented with a small popup, from it select “New integration”.

S2member 01
To collect your API Key: You will need to login to S2Member on a separate tab and collect the key from the API options within S2Member.

After logging into S2Member, select the tabs in the following order: S2Member add-on -> API / Scripting -> Pro API for remote operations.

NOTE: S2Member and/or WordPress may change their website from what appears in this document, but there should still be an API section with the key information. Copy the API key from the Pro API for remote operations tab. See: Instructions from S2Member on  their API Key

Membership 03

Getting Your S2 Member ID

Because you will need an integration with each S2 Membership Level you have, you need to know which ID each level is.

After logging into S2Member, select the tabs in the following order: S2Member add-on -> General Options -> Define Membership Levels and Packages.

NOTE: The S2Member add-on will not be labeled OptimizeMember. Example: If you want to use Level #0 (Free Subscribers) the membership ID will be 0.  Level #1 will be 1.

Membership 04
Now go back to Kartra.

Membership Name First, you will want to give your S2 Membership level a name (Marked #1 Below). This is for your use only, but you will want something that is easy for you to recognize so you know which site and membership level this integration is.

Next, you will need two different URLs, these are unique to each membership website, and you need to use the links as they were set up via your S2 Member.

URL to WordPress integration The “URL to WordPress integration” will be the folder where your WordPress is Installed.

S2member New
 

API KEY Now paste your S2 Member “API Key” into the integration window (Marked #3 Above).

Membership ID Since this integration will be specific to a predesignated Membership level, you will add that ID here (Marked #4 Above).

On Refund / Cancellation You will want to assign an action (Marked #5 Above) in the event the customer cancels/refunds the purchase.  Deleting will delete the user. While Downgrade user will set the user to another membership ID of your choice.


At this point the create button should be enabled (Marked #6 Above), press to finish your Wishlist membership integration.

NOTE:

If you are unable to find the “API Key” on S2 Member or have any other issues with collecting the API information, please contact S2 Member support. If your S2 Member API Key does not work via Kartra, please contact Kartra support.

K20180309JG/MJS

Wishlist

Before We Get Started…

Wishlist membership integration into Kartra will require an API key from Wishlist, a URL to the membership portal provided by Wishlist, and the URL for the Wishlist integration.  If you have any trouble finding them, the folks at Wishlist support will point you in the right direction


The Integrations Section

These Integrations are available by going to “My Integrations” on the sidebar (Marked #1 Below), you may need to click “Integrations” from the top menu as well. There are a number of integrations available, but you can quickly sort out membership integrations by clicking “Membership” from the drop down (Marked #3 Below).

Membership Update 01

From the list of Membership Integrations, you will look for Wishlist.  Click the dots icon (marked #1 Below) and select “New integration” (Marked #2 Below).

Membership Update 02

Getting Your Wishlist API Key

To collect your API Key: You will need to login to Wishlist on a separate tab and collect the key from the API options within Wishlist.

After logging into Wishlist, select the tabs in the following order: Settings -> Configuration -> Miscellaneous


NOTE: Wishlist may change their website from what appears in this document; but there should still be an API section with the key information. Scroll down the page until you reach the section where it displays your API key. See: Wishlist API Instructions


How Do I Connect Wishlist?

Now go back to Kartra.

First, you will want to give your Wishlist Membership level a name (Marked #1 Below). This is for your use only, but you will want something that is easy for you to recognize so you know which site and membership level this integration is.

Next you will need a URL, this is unique to each membership website and you need to use the link as they were setup via your Wishlist settings.

The “URL to Wishlist integration” (Marked #2 Below) will likely be where you as admin log into the website.

*Please Note: This may instead be the URL where your users of the Wishlist membership will need to login. This all depends on a variety of settings we do not manage on the Kartra end and may require some trial and error on your behalf to figure out which one will work with our system.


2018 09 05 1833
*Please Note:

  1. Ensure you also set http:// or https:// depending on what your site is currently set to.
  2. URL to WishList integration and is the root of your wishlist page, similar to “yoursite.com/admin/”.  This does vary from user to user; please ensure it is your admin root on WordPress.

Now paste your Wishlist “API Key” into the integration window (Marked #3 Above).  Press “Load Wishlist data” button (Marked # 4 Above) to load your Wishlist data into Kartra.

At this point the create button should be enabled (Marked #5 Above), press to finish your Wishlist membership integration. Congratulations, you are done!


*FINAL NOTES:

  1. If your WishList integration is still not working, the most common issues tend to be typos with the URLs and missing ” / ” in the URLs as well.
  2. If you are unable to find the “API Key” on Wishlist or have any other issues with collecting the API information, please contact Wishlist support.
  3. If, upon double confirming your Wishlist credentials and verifying you’ve entered them in the correct fields, the integration still wouldn’t work, please contact Kartra support.


K20180309JG/MJS

Digital Access Pass

BEFORE WE START… In order to create the communication bridge to Digital Access Pass (DAP), you need to download a small PHP file (make sure to unzip it!) and FTP-upload it into the folder where DAP is installed in your server.

For example, if you have installed DAP at YourDomain.com/DAP, then upload the file so its URL is YourDomain.com/DAP/dap-kartra.php

Once that PHP file is uploaded to your server, we can start the configuration process.

DAP membership integration into Kartra will require a Connection Key from Kartra, an Secret key from DAP, a URL to the membership portal provided by DAP, and the URL for the DAP Notification (which is the link to the PHP file you just uploaded. Example: YourDomain.com/DAP/dap-kartra.php)

Note: The rest of this documentation will assume you are an active user of the DAP service and know all the details of its own installation and use.  Please contact your DAP support for more information on using the DAP service.

Upon selecting the DAP tab within the external membership integration window you will be presented with the following.

2018 09 05 1841


The membership portal URL is to be copied in to the membership portal location.  The notification URL you collected from the installation of your DAP add-on and can be placed in the section dedicated to it in the Kartra integration setup.  Normally this notification URL will be of a similar format to http://YOURSITE.com/dap/dap-kartra.php .  Visit Configuration → XML Postback page and set the IPN URL to point to http://YOURSITE.com/dap/dap-kartra.php in most DAP setups, however this is not a guarantee and is dependent how you setup your DAP.

2018 09 05 1844


The Secret key can be collected from the configuration info window in DAP.  Navigate to the left sidebar option “Digital Access Pass (DAP)” from your WordPress add-on.  Select the “Setup” tab on the top bar; and then the “config” option within the “Setup” tab.

Scroll down through various options to get to the section shown below to collect your secret key.

Note: Kartra will use the same integration that DAP uses for other payment processing providers and may not be mentioned.  However, it should work.

Also the DAP product/level can be taken from the “Products/Levels” tab on the top bar, and then take the name from the product list.

Once you have the secret key, place it in the section shown in the image below.

2018 09 05 1845


At this point with all options filled in, the create option will enabled. By selecting create you can now finish your DAP membership integration.

Note: Be sure and fill in a name for your membership integration.

If you are unable to find the “Secret Key” on DAP or have any other issues with collecting the information, please contact DAP support for help to navigate their website.

If your DAP Secret Key/information does not work via Kartra, please contact Kartra support.

Note: DAP is one of the more complex integration to use with Kartra and we would recommend most users use the Kartra membership service or be an advanced user of the DAP system.

aMember

IMPORTANT: Before we start, it’s important to note that the aMember integration will require the installation of the Kartra.php file in your aMember installation. You may download the Kartra.php file here: AMember Integration (This should include a Read_Me.txt and Kartra.php files). If you have questions about installing a plugin into your aMember account, please contact the aMember support and provide them the Kartra.php file from the zip file linked above.

When uploading the php file to your aMember directory, the directory should look like this:

108

* Note that the word “blog” in the URL path may be replaced with your aMember unique root path, but the rest of the URL should be exactly as displayed above.


Now that you have the Kartra plugin installed on your aMember, let’s proceed with the configuration!

You will need a Secret key (which can be any string of numbers and/or letters your wish), a URL to the membership portal provided by aMember, and the URL for the aMember notification integration.  As well as the above information, Kartra will provide a connection key which will need to be used in the aMember products system.

Note: The rest of this documentation will assume you are an active user of the aMember service and know all the details of its own installation and use. Please contact your aMember support for more information on using the aMember service.

Upon selecting the aMember tab within the “my integrations” in Kartra you will be presented with the following.

109

Select the “+ New integration” option to create a new integration.

You will be presented with a “New membership integrations” modal window.  You will need to create a name for your aMember integration, enter the name in the “MEMBERSHIP NAME” area on the window.

110

The membership portal URL will be the root login portal for your aMember.

The URL will look like the following: http://YOUR-aMember-URL.com/amember (replace YOUR-aMember-URL.com with your aMember site’s root URL)

The notification URL will be similar as it will be the following: https://YOUR-aMember-URL.com/amember/payment/kartra/ipn

Note: It is not shown in the image below, but you will need to change http: to https: in your notification URL.

111

The connection key will be provided to you upon creation of this integration and will be used with the products on your aMember site that you would like integrated with Kartra.

After you install the Kartra plugin on your aMember site, you should see the following appear on your product setup with aMember: (near the bottom of the setup)

112

This is where you place your “Connection Key” into aMember.

Finally, create a secret key in the location on the Kartra window as shown below: (Yes, you create this; please only use letters and/or numbers with no symbols or spaces)

113

Inside aMember you will need to copy the secret key you created into the configuration for your Kartra plugin.
114

Place the secret key in the secret key section and update the other fields with the labels/info you desire.

Note: If you have not installed the Kartra.php file correctly you will not see this option in your setup/configuration.


At this point with all options filled in, the create option will enabled in the Kartra integration. By selecting create you can now finish your aMember membership integration.

115

If your aMember integration does not work via Kartra, please contact Kartra support.

If you cannot install your Kartra plugin into aMember, please contact your aMember support and provide them the Kartra.php file located here: AMember Integration

Braintree

Braintree provides services to help merchants accept online and mobile credit card processing. You will need to have a Braintree account to integrate it with Kartra. You can join braintreepayments.com.

Kartra allows for unlimited gateways, even of the same kind, so you can add as many payment gateways as your heart desires. The only catch? You can only use PayPal and other credit card gateway per product.

In order to integrate Braintree, you will want to click My Integrations (Marked #1 Below) on the sidebar. Then you should be taken to Integrations. If not click Integrations (Marked #2 Below) in the top menu.

To make things just a bit easier, go to the drop down box and choose “Payment” (Marked #3 Below) and this will display only the four payment gateway integrations. You will see a green checkmark next to any integrations you have already set up.

Integrations Payment

Each of the Payment Gateways has their own little box. You want to click the three dots (marked #1 Below) under the “Braintree” logo. This will pull up a black menu that will look similar to below. You want to press “New Integration” (Marked #2 Below).

Braintree New

Now that you’ve pressed “New Integration” you’ll see a popup like below.

You will need the following and are marked as they appear in Braintree:

  1. Tokenization Key (Marked #1 Below)
  2. Public Key (Marked #2 Below)
  3. Private Key (Marked #3 Below)
  4. Merchant ID (Marked #4 Below)

Braintree Create

Visit Braintree, and click “Account” then “My User” from the drop-down (Marked#1 Below).

You will need to scroll down the page (Marked #2 Below) to find “API Keys, Tokenization Keys, and Encryption Keys” click “View Authorizations” (Marked #3 Below).

NOTE: Braintree may change their website from what appears in this document.

Braintree Keys

The first key you are going to get is your “Tokenization Key.” It may already be generated (Marked #2 Below). If not, click “Generate New Tokenization Key” (Marked #1 Below). After you see your key, please copy and paste it into your Braintree Integration Tokenization Key.

Braintree Generate Token

Scroll slightly up from Tokenization, and you will see “API Key,” but this section actually holds your three other keys, Public Key, Private Key, and your Merchant ID.

If you see a “Public Key” has already been generated click “View” (Marked #2 Below). Otherwise press “Generate New API Key” (Marked #1 Below) and then click “View” (Marked #2 Below).

Braintree Generate Api

After you press view, you will see your next 3 keys and a javascript code.

Braintree View Keys

You will need to add those three keys to your Braintree Integration.

  • Add the Public Key (Marked #1 Above) to Public Key (Marked #2 Above)
  • Add the Private Key (Marked #2 Above) to Private Key (Marked #3 Below)
  • Add the Merchant ID (Marked #3 Above) to Merchant ID (Marked #4 Below)

After you have confirmed all the information is correct and in the correct spots, press create.

Braintree Create

A new window will open. The window will say

“Success. Important Now, you must put the following URL into your merchant account’s Instant Payment Notification configuration. Learn How.”

Braintree Success

Go back to your Braintree account. Click “Settings” and from the drop-down, click “Webhooks” (Marked #1 Below).

On the webhooks page click “Create New Webhook”(Marked #2 Below).

Braintree Webhook

On the next screen, you will click “Add Endpoint” (Marked #1 Below).

Now you should be on the Webhook Creator. Add your endpoint URL “https://app.kartra.com/notifications/braintree” (Marked #1 Below).

On Notifications, click the box beside all the notifications (Marked #2 Below).

Click “save” (Marked #3 Below)

Braintree Webhook New

Now your Braintree Transactions should be communicated to Kartra!

Authorize.net

Authorize.net provides services to help merchants accept online and mobile credit card processing. You will need to have an Authorize.net account to integrate it with Kartra. You can join Auth.net at http://Authorize.net.

Kartra allows for unlimited gateways, even of the same kind, so you can add as many payment gateways as your heart desires. The only catch? You can only use PayPal and other credit card gateway per product.

In order to Integrate Authorize.net, you will want to click My Integrations (Marked #1 Below) on the sidebar. Then you should be taken to Integrations. If not click Integrations (Marked #2 Below) in the top menu.

To make things just a bit easier, go to the drop down box and choose “Payment” (Marked #3 Below) and this will display only the four payment gateway integrations. You will see a green checkmark next to any integrations you have already set up.

Integrations Payment

Each of the Payment Gateways has their own little box. You want to click the three dots (marked #1 Below) under the “Authorize.net” logo. This will pull up a black menu that will look similar to below. You want to press “New Integration” (Marked #2 Below).

Auth Connect

Now that you’ve pressed “New Integration” you’ll see a popup like below.

You can see, you’ll need your API Login, Transaction Key, Signature Key, and Public Client Key.

Auth Create

IMPORTANT: Be sure you have signed up for the Customer Information Manager (CIM) service. This is a required Authorize.net feature to ensure PCI compliance.

Login to Authorize.net and go to Account, (Marked #1 Below), then go to “Settings” (Marked #2 Below). Next, you will scroll down to “Security Settings” and look for “API Credentials & Keys” (Marked #3 Below). Press “API Credentials & Keys”

Auth Api

The screen should look similar to below. Copy your API Login ID (Marked #1 Below).

Next, you need your Transaction Key. During the setup of your Authorize account, you created a secret question, you will need the answer to get your keys.  Below the question, click obtain “New Transaction Key” (Marked #2 Below).

Auth Api Login

The next screen will be your Transaction Key (Marked #1 Below) be sure to copy to the Transaction Key in your Kartra Integration. Once done, click “Continue” (Marked #2 Below).

Auth Api Transaction

After you press continue, you will be taken back to your Authorize Settings, repeat the process above for Your Transaction Key, but this time you need to click obtain “New Signature Key” (Marked #3 Below).

Auth Api Login

On this screen you’ll see your EXTRA EXTRA long Authorize Signature Key (Marked #1 Below). Paste the Secret Key on your Authorize.net Integration within Kartra. Then press continue

Auth Api Signature

After you obtain your Authorize Signature Key and press continue, you should be taken back to your Authorize.net Settings.

If not, click “account” (Marked #1 Below), then Settings (Marked #2 Below).

Under Security Settings, click “Manage Public Client Key”(Marked #3 Below).

Press Create (Marked #3 Below).

Auth Client

You will once again be asked your Secret Question. After you answer, you will see your Authorize Public Client Key. Copy your key and paste it into your Authorize Integration with Kartra.

Auth Client Key

Be sure you pasted your API and three different keys into the correct places on your Kartra Integration.

After you have confirmed all the information is correct and in the correct spots, press create.

Auth Create

A new window will open. The window will say the following:

“Success. Important Now, you must put the following URL into your merchant account’s Instant Payment Notification configuration. Learn How.”


Now go back to Authorize.net.

Auth Success

Go back to your Authorize settings. Click “account” (Marked #1 Below), then Settings (Marked #2 Below).

But this time you need to scroll lower on the page to Business Settings, click “Webhooks”(Marked #3 Below).

Auth Webhook

On the next screen, you will click “Add Endpoint” (Marked #1 Below).

Auth Webhook Add

Now you should be on the EndPoint editor. Give your Webhook a name (Marked #1 Below). Add your endpoint URL “https://app.kartra.com/notifications/authorize_net” (Marked #2 Below).

In the drop-down, change the status to “Active” (Marked #3 Below). Under “Select Events” choose “All Events” (Marked #4 Below).

Auth Webhook Editor

Now your Authorize.net Transactions should be communicated to Kartra!

Stripe

Stripe is an industry leader for simplicity and security in payment gateways. You will need to have a Stripe account to integrate it with Kartra. You can join Stripe at http://Stripe.com, it’s easy to apply for and use.

Kartra allows for unlimited gateways, even of the same kind, so you can add as many payment gateways as your heart desires. The only catch? You can only use one PayPal and one other credit card gateway per product. You can use a Stripe account that is connected to another cart as long as that cart does not have limitations of only their connection.

In order to Integrate Stripe, you will want to click My Integrations (Marked #1 Below) on the sidebar. Then you should be taken to Integrations. If not click Integrations (Marked #2 Below) in the top menu.

To make things just a bit easier, go to the drop down box and choose “Payment” (Marked #3 Below) and this will display only the four payment gateway integrations. You will see a green check-mark next to any integrations you have already set up.

Integrations Payment

Each of the Payment Gateways has their own little box. You want to click the three dots (marked #1 Below) under the “Stripe” logo. This will pull up a black menu that will look similar to below. You want to press “New Integration” (Marked #2 Below).

Stripe New

Now that you’ve pressed “New Integration” you’ll see a popup like below.

Stripe Create

Login to Stripe and go to “developers” and “API keys” tabs. (Marked #1 Below).

Click beside “Secret Key” on “Reveal test key token”. This will reveal the secret key that you need to use within Kartra. Copy the key.

Do not close your Stripe Tab. You will need it again in a moment.

Stripe Update 03

Choose Stripe from the Payment Gateway options from within Kartra.

Paste the Secret Key from Stripe via the above steps (Marked #1 Below).

Paste the Publishable Key from Stripe via the above steps (Marked #2 Below).

Press Create (Marked #3 Below).

Stripe Create

A new window will open.

You will see “Success. Payment gateway created successfully! Must Do: Now, you must put the following URL into your merchant account’s Instant Payment Notification configuration.”

Now go back to Stripe. You should still be on API Keys.

Stripe Success

If you are still on the Developers/API Keys tab within Stripe, you can just click “Webhooks” option (located below “API Keys” in the menu)

  • Click “Add Endpoint”.
  • In “Endpoint URL” insert https://app.kartra.com/notifications/stripe .
  • Select “receive all events”.  Note: this is not in the typical drop-down and is a separate choice. As shown in image:

Stripe Update 04

  • Another note: you may receive a message saying this might be too many messages and could slow down your system.  Just accept and go through the prompts, your system will not slow down due to your settings despite this warning and it can be ignored.
  • Yet another note: It appears a recent update may have removed the “receive all events” from your choices within Stripe. If that is the case you will just need to select all events in each category drop-down. There should be a select all button within each category. Just make sure everything is selected and you do not miss anything.
  • Click Add Endpoint when complete.

Now your Stripe Transactions should be communicated to Kartra!

Paypal

If you want Kartra to process payments through your PayPal account*, you will need to integrate both platforms, and grant Kartra some permissions so it can initiate, cancel and refund transactions on your behalf.

* As per PayPal’s policies, Personal PayPal accounts cannot be used as payment gateways. You will need a Business or a Premier account.

In order to Integrate PayPal, you will want to click My Integrations (Marked #1 Below) on the sidebar. Then you should be taken to Integrations. If not click Integrations (Marked #2 Below) in the top menu.

To make things just a bit easier, in the drop down box and choose “Payment” (Marked #3 Below).  This will display only the four payment gateway integrations.

NOTE: You will see a green checkmark next to any integrations you have already set up.

Integrations Payment

Each of the Payment Gateways has their own little box. You want to click the three dots (marked #1 Below) under the “PayPal” logo.

This will pull up a black menu that will look similar to below. You want to press “New Integration” (Marked #2 Below). This will open a new popup, as displayed below.

Paypal New

Press the Connect Button (Marked #3 Above). Log into PayPal at the prompt. Be sure you are logged into your business account.

Next, you’ll see a screen similar to below. PayPal is advising you that “You are giving permission to Kartra to access specific information in your account and take actions on your behalf” which is correct and necessary to receive money. This connects your PayPal to Kartra

NOTE: If you see “Only Business or Premier Accounts can grant this permission”, it means that you’re probably running a Personal PayPal account which, as stated above, is not eligible to function as a payment gateway.

Integrations Payment Gateway Paypal Permissions

This popup should close and take you back to Kartra. And the Kartra Integration will ask for your PayPal PDT Token.

However; you will need to now login to PayPal to get your next piece of information, the PayPal PDT Token.

What is the PayPal PDT Token?

*Note that PDT Tokens are only available for Business accounts. Therefore, a Paypal Business account (as opposed to Personal) is required for the Kartra Integration.

The PDT Token is a Payment Data Transfer. This is PayPal’s secure method of transferring customer purchase data securely back to Kartra so you have a record of the transaction. Kartra needs an active PDT Token in order to be able to securely redirect your customers back to your desired Thank You page upon completing their payment in PayPal.

Paypal Create

To configure your PDT Token, log in to your PayPal account and…

  1. Click the gear icon in the top right (Marked as #1 below) of the PayPal dashboard and choose Account Settings (Marked as #2 below).
  2. Click Website payments under “Products & Services” on the left of the page. (Marked as #3 below)
  3. Click Update beside Website preferences. (Marked as #4 below)

PayPal Websitepayments 01

On the Screen that follows, turn on “Auto Return for Website Payments” (Marked #1 Below)

For Return URL, you may enter https://Kartra.com (Marked #2 Below), or indeed any URL you want. You see, Kartra will not actually read the Return URL from this field. Instead, you’ll in fact configure the redirect URL from within the Product Configuration area inside your Kartra account, and that’s the one Kartra will redirect to upon a successful payment.

Turn ON “Payment Data Transfer” (Marked #3 Below). Your PDT token may not appear until you have saved the page.

Scroll all the way to the bottom and press save.

PayPal Websitepayments 02

This will take you back to your Business Profile Settings. Now, once again you have to navigate your way back to My Selling Tools, and from there to Website Preferences (just like before).

Under “Payment Data Transfer”, you will now see the long Identity Token (see “3” in screenshot above).

Go Back to Kartra. Paste that Identity Token in the PDT Token field (see “2” below).

Now the “CREATE” Button should be green, click it to save your Payment Gateway.

Paypal Create

Your payment gateway should now be finally setup! However, there’s one last thing to do inside your PayPal account…

The Instant Payment Notification

There is one more thing that needs to be checked in order to make sure everything is working smoothly: we need to configure an Instant Payment Notification.

We need to make sure that your IPN notifications are turned ON. This is needed for Kartra to be able to track refunds, recurring payments and any of the other many notifications PayPal sends out in the background.

Let’s follow these steps:

  1. Click the gear icon in the top right of the PayPal dashboard and choose Account Settings.
  2. Click Notifications under “Business Profile” on the left of the page.
  3. Click Update beside Instant payment notifications. See screenshot below:

    211

  4. Click Choose IPN Settings
  5. Enter http://kartra.com in the Notification URL field.
  6. Select Receive IPN messages (Enabled) and click Save.

If your IPN notifications page looks like the screenshot bellow, you do not need to do anything else. The Notification URL might be different but don’t worry, that bit is not important. What really matters is that the Message Delivery is Enabled.

Set Ipn 4

In the other hand, if the Message Delivery is Disabled, or if the page shows like the screenshot bellow, then please click on “Choose IPN Settings”.

Set Ipn 2

In the next page, at the Notification URL input field, type “https://kartra.com“. Make sure the Receive IPN Messages radio button is ticked ON, and then click Save.Set Ipn 3

Now your IPN should be enabled, and the PayPal integration is finally complete!

Membership Integrations: overview

Here you will find any necessary information to set-up a membership integration.

Kartra has the ability to integrate with a few different membership systems:

These Integrations are available by going to “My Integrations” on the sidebar (Marked #1 Below), you may need to click “Integrations” from the top menu as well.

There are a number of integrations available, but you can quickly sort out membership integrations by clicking “Membership” from the drop down (Marked #3 Below).

Membership Update 01


NOTE: Utilizing these gateways will involve a combination of using the specific service’s own API and the Kartra system.  This will mean some services can be corrected in Kartra while others will need to be addressed on the other company’s end.  This document will try to help clarify those differences.

Payment Gateways: overview

 Kartra integrates with four different payment gateways:

To add your payment gateways you will click My Integrations (Marked #1 Below) on the sidebar. Then you should be taken to Integrations. If not click Integrations (Marked #2 Below) in the top menu.

To make things just a bit easier, go to the drop down box and choose “Payment” (Marked #3 Below) and this will display only the four payment gateway integrations. You will see a green check-mark next to any integrations you have already set up.

PaymentGateway Update 01

PLEASE NOTE: 

These gateways involve a combination of using the specific service’s own API and the Kartra system.  This will mean some services can be corrected in Kartra while others will need to be addressed via the payment gateway.

SMS Gateways: overview

Here you will find any necessary information to setup a SMS gateway.

Please Note the following considerations:

1. Kartra integrates with three different SMS gateways: Twilio, Plivo and Vonage. One of these services will be required to send SMS messages from Kartra directly. Here you can find direct links to our documentation to integrate each service:

2. Utilizing these gateways will involve a combination of using the specific service’s SMS settings and our own Kartra system.  In Kartra you will set up the API integration itself, but chances are that you might also need to configure some other parameters inside the gateway’s console.

3. Once the API data is entered in Kartra, you will be able to send yourself a test SMS to confirm that both applications are communicating with each other. Please ensure you complete at least one test to ensure your setup is working as intended before you start to use it within Kartra.

Test SMS 01

4. Some SMS services will charge based on the number of messages you send or have other types of limitations on their end (Such as a specific number of sends per month). Please ensure you are within your SMS account’s limits when you send messages from Kartra. As the Kartra software will not be able to determine if you hit these limits and will merely not send the messages or show an error.

5. When sending an SMS message there is a maximum limit of 127 characters that is universal to the entire SMS system as a whole. Our system does require seven or more characters to communicate the appropriate data via the API. So when you send messages from Kartra there may be a hidden limit on characters (Usually around 120), but this will vary based on your SMS service. As most messages sent in an SMS service that go over this character limit will just send a second message to accommodate for the size of the message.

*Please Note: This does mean that you can send X messages via Kartra and it will show many more messages within your SMS based on how many characters were in your message. 241 characters as an example would require three messages within most SMS providers and result in 3x as many messages being sent via your SMS as shown in Kartra analytics (120 characters per message and the last message to contain the last 1 letter carry over) .


Email Gateways: overview

Here you will find any necessary information to setup a email gateway.

Some general notes to consider:

1. Kartra has the ability to integrate with four different email systems; SendGrid, PostMark, ElasticEmail, and MailGun.

Email 01

Email 02


2. Each gateway will have its own unique method of connecting to the Kartra system.

3. The Kartra user during creation of the integration will be able to test the email gateway by selecting the test option.

*Please Note: The email in the box is the email you want to receive the test.  (Despite the example below, this can be a any type of email service; including free)

4. Upon completion of the gateway, Kartra will present you with a webhook that can be used on your email service provider’s site.

Email 03

© 2024 Kartra All Rights Reserved