Authorize.net
Authorize.net provides services to help merchants accept online and mobile credit card processing. You will need to have an Authorize.net account to integrate it with Kartra. You can join Auth.net at http://Authorize.net.
Kartra allows for unlimited gateways, even of the same kind, so you can add as many payment gateways as your heart desires. The only catch? You can only use PayPal and other credit card gateway per product.
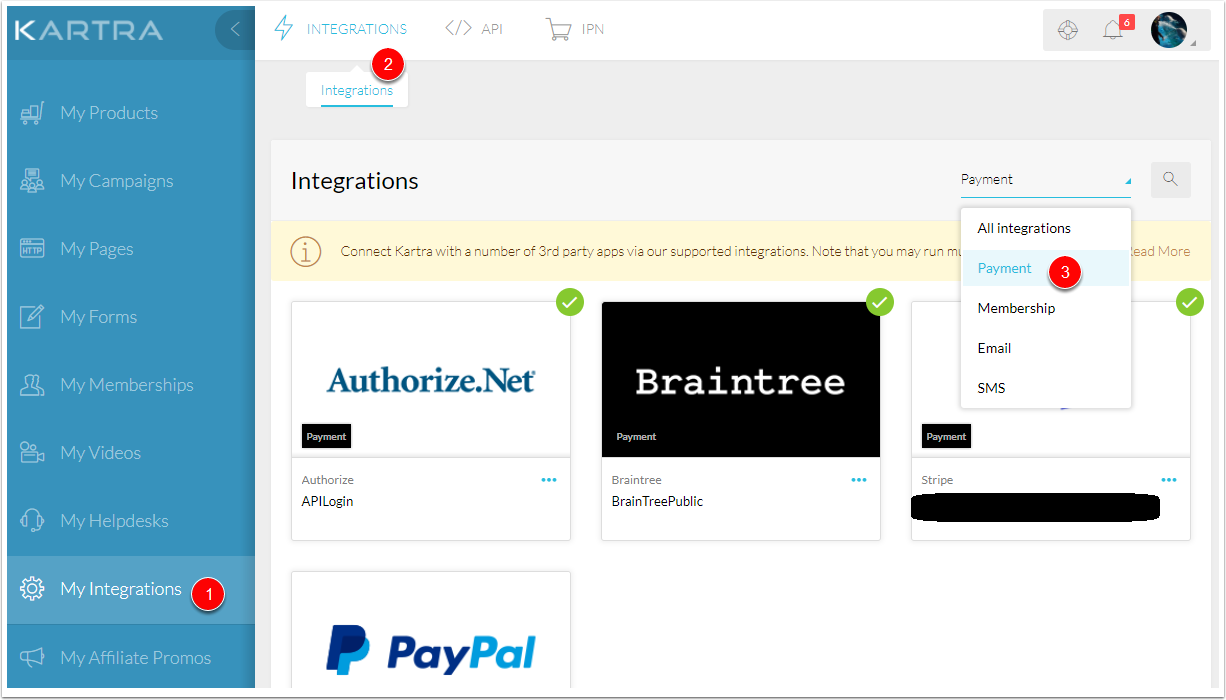
In order to Integrate Authorize.net, you will want to click My Integrations (Marked #1 Below) on the sidebar. Then you should be taken to Integrations. If not click Integrations (Marked #2 Below) in the top menu.
To make things just a bit easier, go to the drop down box and choose “Payment” (Marked #3 Below) and this will display only the four payment gateway integrations. You will see a green checkmark next to any integrations you have already set up.
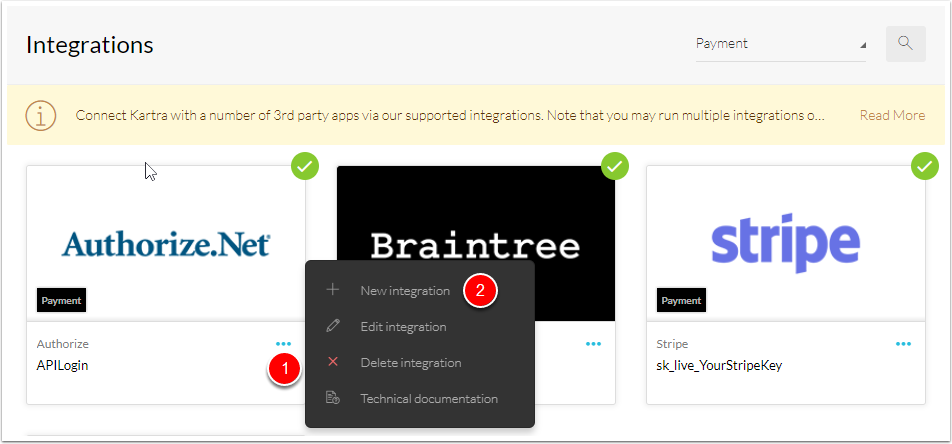
Each of the Payment Gateways has their own little box. You want to click the three dots (marked #1 Below) under the “Authorize.net” logo. This will pull up a black menu that will look similar to below. You want to press “New Integration” (Marked #2 Below).
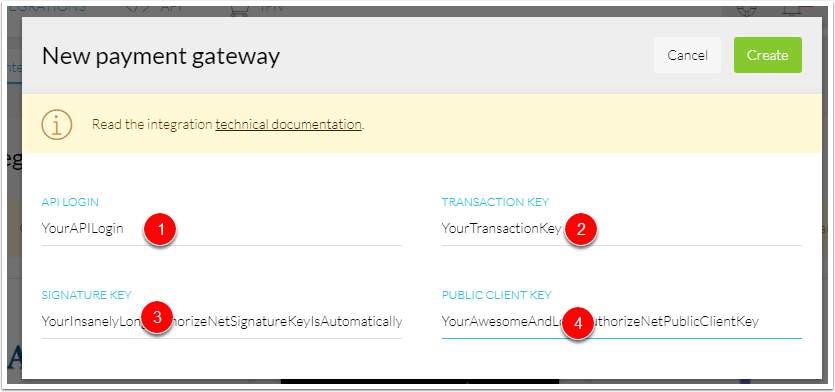
Now that you’ve pressed “New Integration” you’ll see a popup like below.
You can see, you’ll need your API Login, Transaction Key, Signature Key, and Public Client Key.
IMPORTANT: Be sure you have signed up for the Customer Information Manager (CIM) service. This is a required Authorize.net feature to ensure PCI compliance.
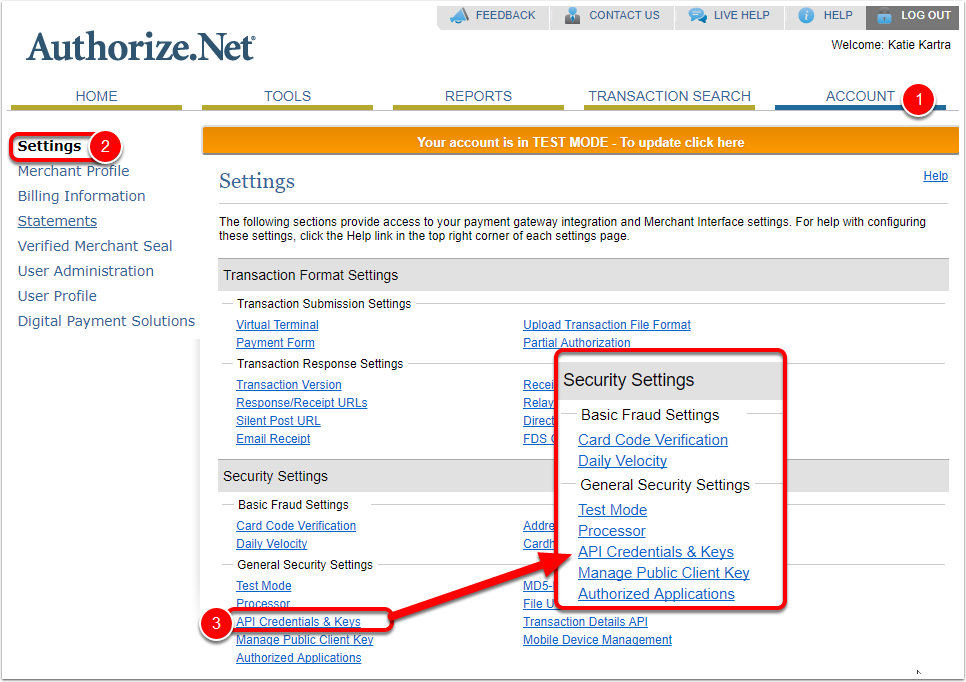
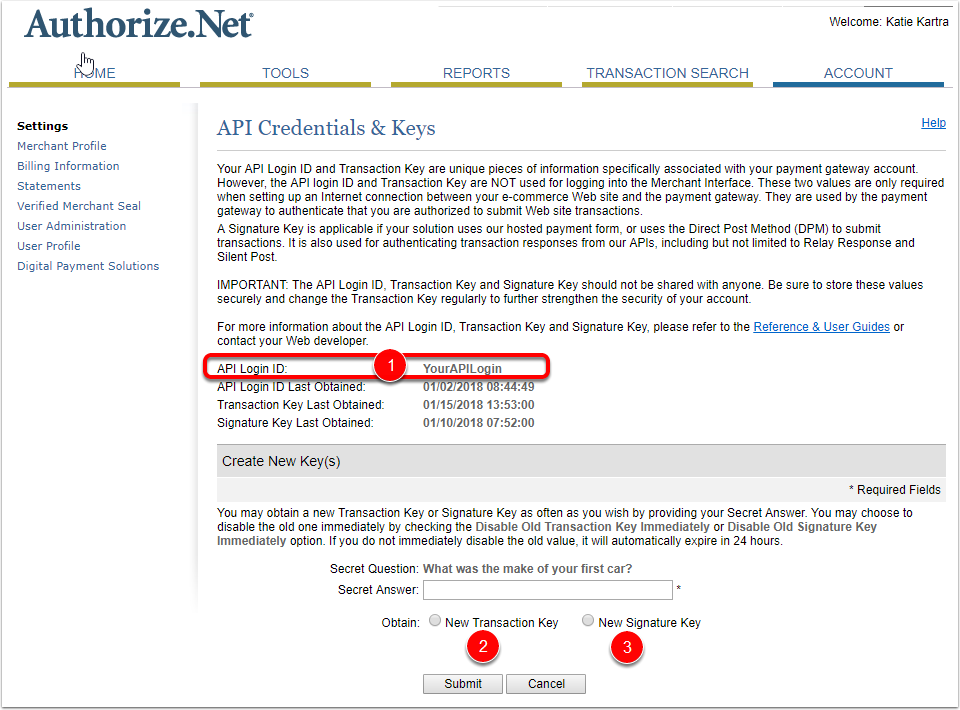
Login to Authorize.net and go to Account, (Marked #1 Below), then go to “Settings” (Marked #2 Below). Next, you will scroll down to “Security Settings” and look for “API Credentials & Keys” (Marked #3 Below). Press “API Credentials & Keys”
The screen should look similar to below. Copy your API Login ID (Marked #1 Below).
Next, you need your Transaction Key. During the setup of your Authorize account, you created a secret question, you will need the answer to get your keys. Below the question, click obtain “New Transaction Key” (Marked #2 Below).
The next screen will be your Transaction Key (Marked #1 Below) be sure to copy to the Transaction Key in your Kartra Integration. Once done, click “Continue” (Marked #2 Below).

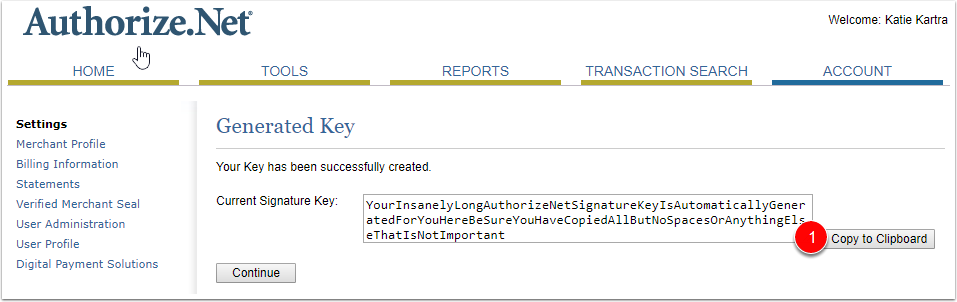
After you press continue, you will be taken back to your Authorize Settings, repeat the process above for Your Transaction Key, but this time you need to click obtain “New Signature Key” (Marked #3 Below).
On this screen you’ll see your EXTRA EXTRA long Authorize Signature Key (Marked #1 Below). Paste the Secret Key on your Authorize.net Integration within Kartra. Then press continue
After you obtain your Authorize Signature Key and press continue, you should be taken back to your Authorize.net Settings.
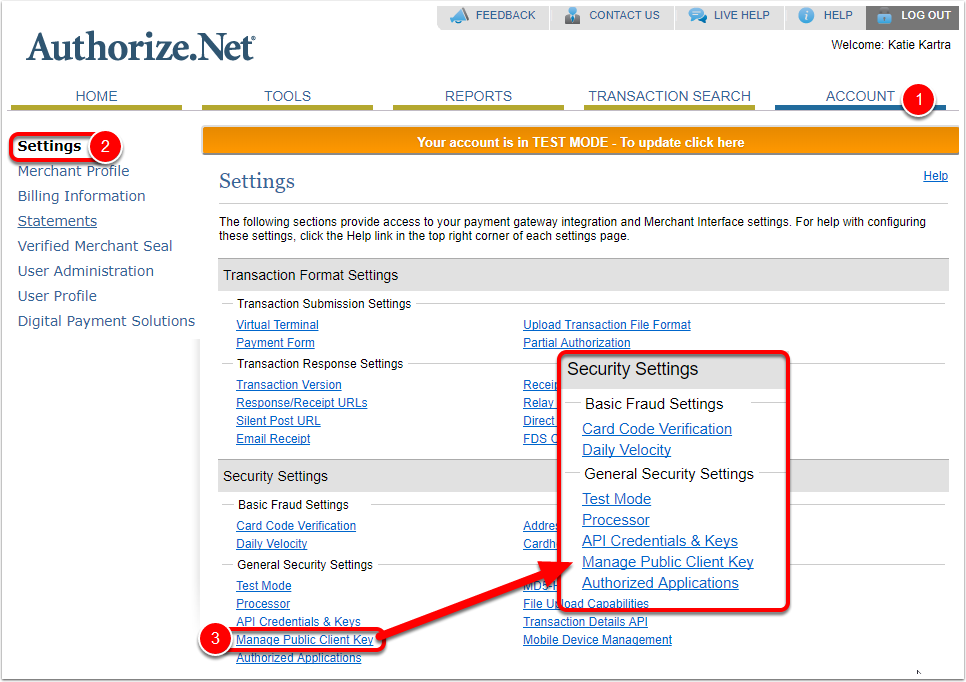
If not, click “account” (Marked #1 Below), then Settings (Marked #2 Below).
Under Security Settings, click “Manage Public Client Key”(Marked #3 Below).
Press Create (Marked #3 Below).
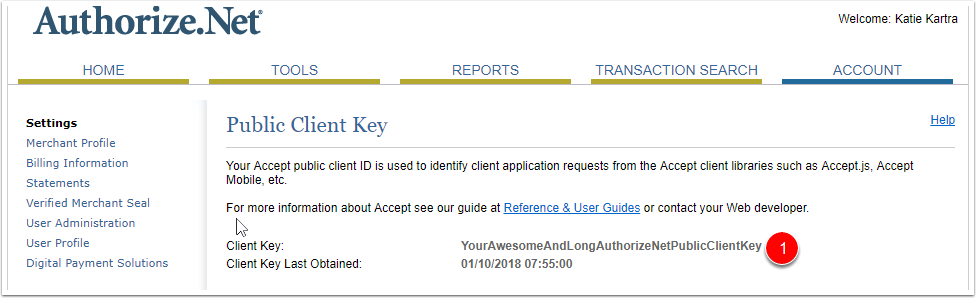
You will once again be asked your Secret Question. After you answer, you will see your Authorize Public Client Key. Copy your key and paste it into your Authorize Integration with Kartra.
Be sure you pasted your API and three different keys into the correct places on your Kartra Integration.
After you have confirmed all the information is correct and in the correct spots, press create.
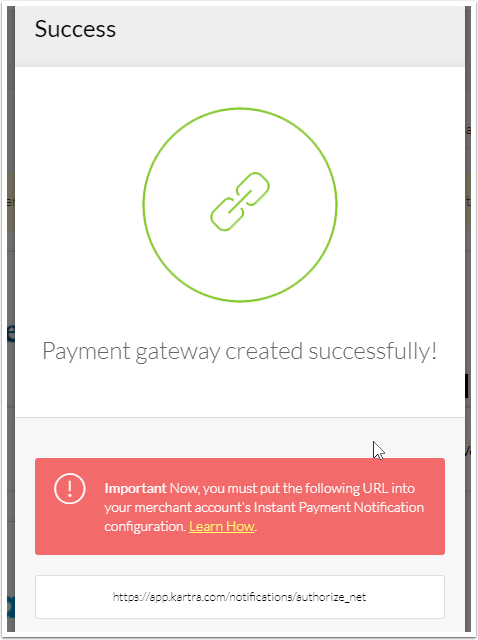
A new window will open. The window will say the following:
“Success. Important Now, you must put the following URL into your merchant account’s Instant Payment Notification configuration. Learn How.”
Now go back to Authorize.net.
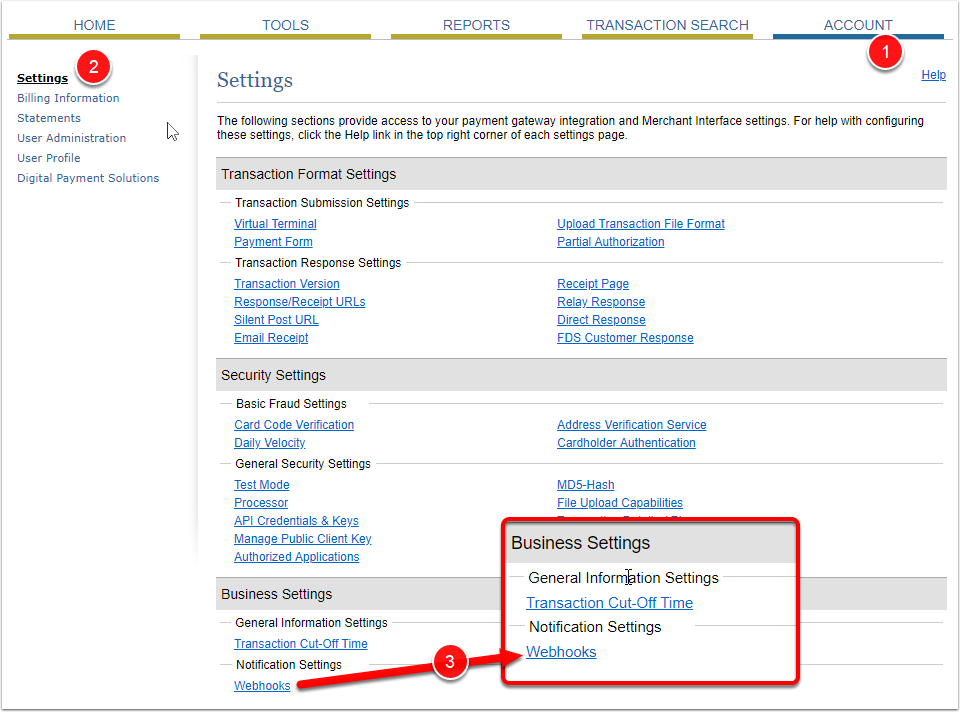
Go back to your Authorize settings. Click “account” (Marked #1 Below), then Settings (Marked #2 Below).
But this time you need to scroll lower on the page to Business Settings, click “Webhooks”(Marked #3 Below).
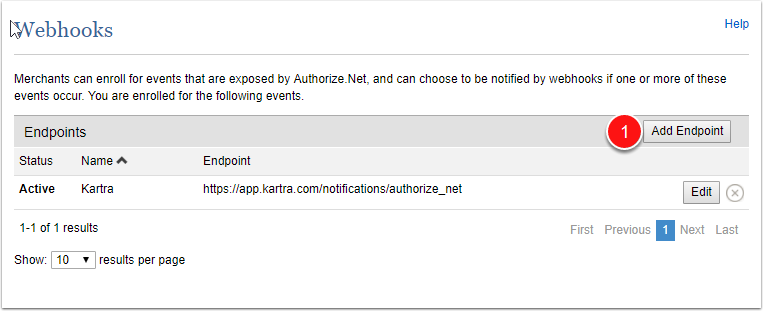
On the next screen, you will click “Add Endpoint” (Marked #1 Below).
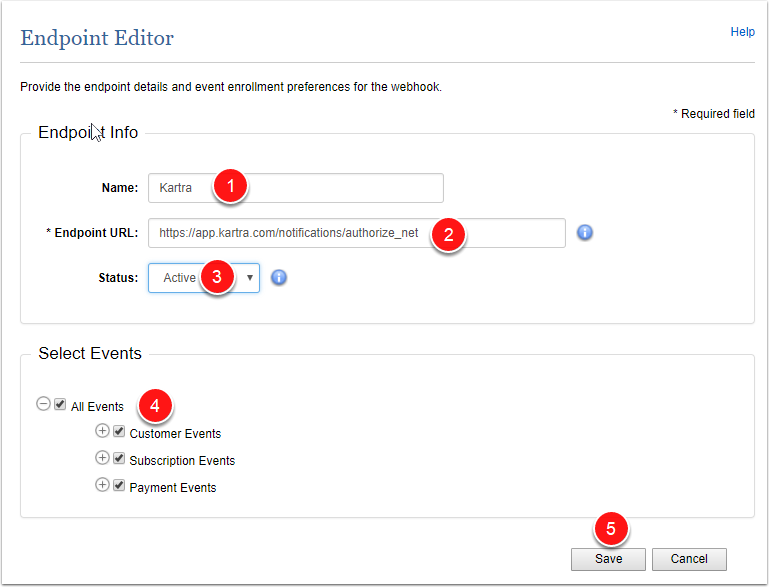
Now you should be on the EndPoint editor. Give your Webhook a name (Marked #1 Below). Add your endpoint URL “https://app.kartra.com/notifications/authorize_net” (Marked #2 Below).
In the drop-down, change the status to “Active” (Marked #3 Below). Under “Select Events” choose “All Events” (Marked #4 Below).
Now your Authorize.net Transactions should be communicated to Kartra!