Kartra Documentation Technical Documentation for Kartra

A bit of house cleaning before we start…

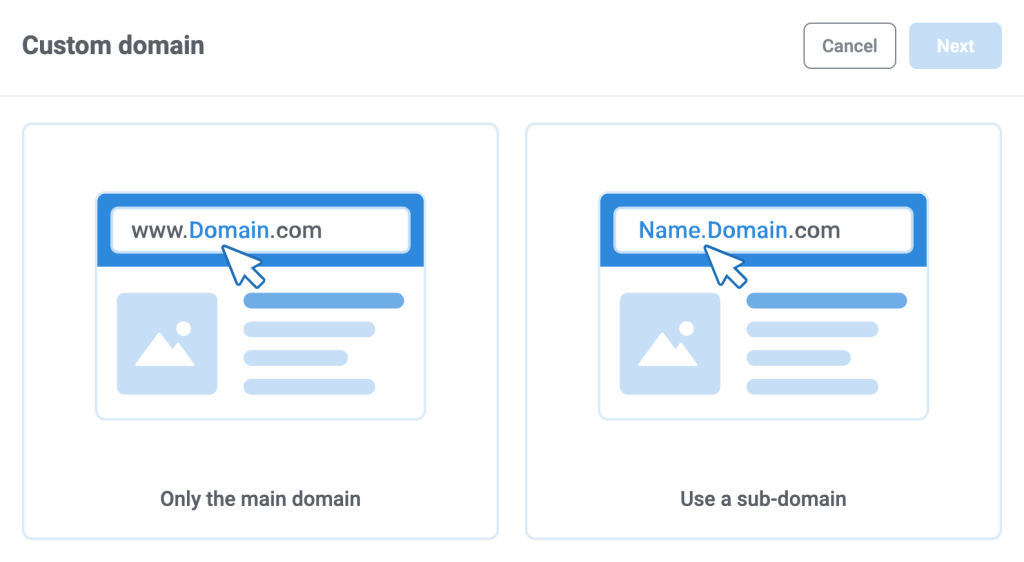
Before you go ahead and initiate an integration with your own domain, please note the following:

  1. The integration process is very simple, but there are some technicalities involved. Nothing to be scared of though! Just make sure to follow this guide step by step.
  2. While the actual configuration barely takes 5 minutes, it might take a few hours to be activated.
  3. If, upon initiating the Custom Domain integration, you don’t complete it within 24 hours, the system will revert the process and you will have to start the integration again.  This will show by removing/deleting the custom domain in Kartra.
  4. If you’re already hosting existing pages in your domain, or if it’s already integrated with another 3rd party app, be aware that all that existing content might cease to work. Once the integration is completed, Kartra will point your domain to your Kartra pages, membership portals, checkout pages, etc, so anything you might have previously hosted in your domain will likely not be accessible any more.
  5. That being said, you can remove the Kartra integration at any time.
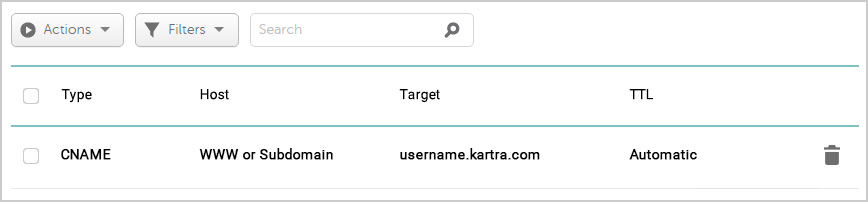
  6. When you connect your domain to Kartra, we will automatically grant a secure SSL certificate to your domain so you can safely use it to host checkout pages. Regardless of whether your domain already has a SSL certificate or not, we will provide one for you.
  7. The entire Kartra network (as well as every integrated domain) is protected behind the cloud based server our system uses, so you don’t need to connect your own CloudFlare or other related account based on what server we may be using for our own back-end server needs. Any domain provider should work as long as you follow the instructions within this documentation.
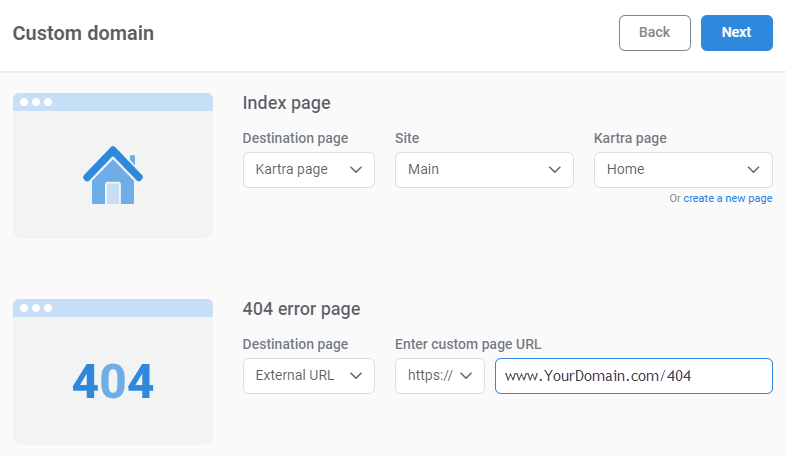
  8. One important thing to note is that this custom domain feature is a re-branding tool for your Kartra based URLs.  Though we do have options to help forward/redirect your users to your pages when they visit the primary URL, our system is not intended to fully replace a website and all the micromanaging you may be used to.
  9. If you are unsure of how to approach your setup, please contact our support channels and include screenshots of all your DNS records and any forward/redirects on your external domain. As we are happy to help point you in the right direction but we do not have access to external content and need your help to fill in those gaps in our knowledge.


*Note: Please read all instructions in this documentation in addition to watching the video before you make any changes to your domain to ensure you do so without issue.

Root domain vs Subdomain

The first step of the configuration process is to decide whether you want to point your Kartra integration (and thus your Kartra Pages, your Kartra checkouts, etc) to www.Domain.com or to SubDomain.Domain.com.

Select a domain connection type

Root domain (shown in this example as the “main” domain) produces a URL format like this:

  • https://www.MAIN.com/custom-page/

Subdomains add an extra directory aspect to the URL. A link with a subdomain looks like this:

  • https://SUBDOMAIN.main.com/custom-page/

Subdomains are often used to differentiate a large chunk of content that is related to the main website but distinct. A common example is support resources:

  • https://www.google.com – The primary Google search engine is found at the root domain
  • https://support.google.com/ – Google support documentation is organized under a subdomain

Next Steps:

Point your CNAME record to Kartra

IMPORTANT: If you are connecting a main domain, create a Forwarding rule first.


The CNAME is a record created in your domain registrar, the service managing your domain property and DNS. The CNAME record is what binds your domain with your Kartra account.

Log into your domain registering service and go to DNS settings (sometimes called DNS Management or Domain Management).

Create a CNAME record and point it to your Kartra account. Details below capture most common cases.

  • Type: CNAME
  • Host: Depending on which option you choose, enter either www if integrating with your main domain, or enter your desired subdomain.
  • Target or Value: Enter username.kartra.com (replace username with your Kartra username).
  • TTL: Default value

4

Next Steps:

Forwarding your root domain

IMPORTANT: this step is ONLY required if you chose to integrate your Main (also known as Root) Domain. It is NOT needed if you’re only integrating a Subdomain.

  • Complete this step before creating a CNAME record.

If you’re integrating your Main Domain, Kartra will be effectively using “www” as a pseudo-subdomain. For that reason, a Forwarding Rule is needed to make sure that if someone types in their browser http://YourDomain.com, they are redirected to https://www.YourDomain.com.

This is called URL redirecting or URL forwarding, and your domain registrar is likely to also have this feature. Check with your domain provider’s support team if you’re not sure where to find this.

5

Log into your domain registering service and go to DNS settings (sometimes called DNS Management or Domain Management).

If you are integrating a main domain, create a Forwarding rule that redirects from YourDomain.com to https://www.YourDomain.com. Instructions below capture most common cases.

  1. Replace YourDomain in the image with your actual domain name
  2. The configuration must be set to Permanent redirect (301) and Forward path
  3. You will need to ensure that users going to YourDomain.com are redirected to https://www.YourDomain.com and not elsewhere. Your domain provider’s support team can confirm if this is possible.
    1. If not possible, we recommend you use the subdomain option to avoid this entire step. When connecting a subdomain, you only need a CNAME.​​​​

Next Steps:

Kartra setup and activation

Important
  • Kartra will automatically provision a secure SSL certificate to your domain upon integration.This certificate ensures a secure environment for hosting checkout pages.
  • Kartra’s comprehensive network, including all integrated domains, is safeguarded by the cloud-based server our system uses. You don’t need a personal CloudFlare account or other related accounts as long as you follow our setup instructions.
Support
  • If the CNAME was not created correctly, the domain won’t connect with Kartra and it will disappear from the Custom domains area. Reach out to our support team with full-screen images of the CNAME and Forwarding settings you created in your domain service provider’s account. This will allow Kartra support agents to see all your settings in the context of your account.

Editing your pages

Important

Custom domains can’t be applied to tracking links, such as

  • Product Tracking Links
  • Page Split Tests
  • Affiliate Promotion Links

Visitors need to visit the Kartra URL to be tracked appropriately.

© 2024 Kartra All Rights Reserved